Losing my mind?
Note; click on pictures to enlarge. back arrow to return to text.
My insurance agent called a couple weeks ago and told me another client had to be rid of a MG for her mother’s estate. It was nearly 100 miles away and not even a “B”. The pictures they sent were pretty discouraging and there was no title, but it did have a 1275cc engine and gear box. I gave her $100 for the “parts” and $200 to the tow truck driver (Tom-a good guy) and next had to decide what to do with it. Part it out, build a race car or restore it..
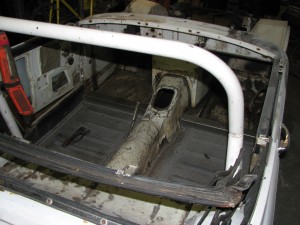
The floors had rusted through or nearly so..
But as I mentioned it did have the drive train and only 36000 showing on the odometer, which works, but the engine was not original color so its been out and did I mention that the throw out bearing was missing the carbon/graphite face and probably was parked many years ago for that reason.
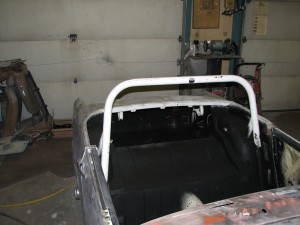
After several days I have most of the paint off the body and engine compartment. The trunk area is pretty much OK as is.
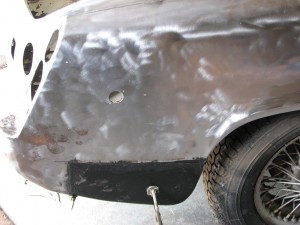
I glued the new pieces in with a 3M bonding mastic for this purpose. A first for me. I don’t like it. It’s very expensive, requires more prep work and needs 24 hours to fully cure. I still have to repair the bottom edges of both rear fenders and I’ll just MIG them in as usual. I understand that the insurance co.’s require the glue for new vehicle repair..
Well, as things would have it, I had another glue cartridge and decided to go ahead and use it up. So here are two methods for gluing repair panels. The small one is probably the superior method. Cut to size, flange the edges, glue and clamp. The inside is wedged against the trunk floor edge with carpenter’s door plumb wooden wedges. In the second photo even though the damaged area was smaller than the first I decided to use the entire patch. Just glue it over the cleaned/prepped substrate and use a bunch of screws to clamp it until it dries, at which time the screws can be removed and the edges feathered with Bondo.
Regardless of the technique it will be interesting to see how these repairs weather time. I will admit that the floor and sill repairs seem very robust and I don’t foresee any problems structurally.
I’ve had a few more days to devote to the Spridget. In the next set of photos I’ve finished with the dent repairs and Bondo phase. I also have coated all non painted and mostly hidden areas with 3M Body Schutz. It’s a rubberized sound deaden-er and sealer. It also serves to give everything a clean uniform look.
The 36 grit tends to leave some “marks” so after the 80 and 180 grit sanding I use some glazing to fill any visibly deep gouges, hence the multi-color appearance in this last photo. Next step is to get the body and engine compartment primed for paint..
Of course the more the details are corrected, the more it pushes one to take it to the next level. I have no idea how the “1 day” paint shops can sleep at night knowing how much better a job they might have done. I’m also starting to appreciate why good body shops charge so much money, the price of materials notwithstanding.
Anyway, here it is in primer and awaiting today’s job of blocking. I did 3 coats of primer so I’m going to start with 180 grit to speed the process along. I finish with 400 wet or finer..
So today I spent 10 hours block sanding every square and curved inch of the project car. I used 180 grit dry since I had applied 3 or more coats of primer before the guide coat and 400 or finer used wet would have been a multi-day affair. I found some low spots and filled them and I found some high spots and I hammered them, and then I re-shot the repaired or sanded to bare metal areas with another coat of primer and then I re-shot the entire car with a light even coat. Next I’ll do the 400 grit wet and it should go very quickly as it it already flat and straight except at the repaired spots, but they are small and not very numerous. After that step it’s time to consider paint type and color… decisions, decisions… And lastly, but not leastly.. a tip of the hat to my pal Bruce, who volunteered to come over and help with the blocking. Thanks bud!! PS: I’d add more pictures, but it looks just like the ones above.. or nearly so.
Well…… I went and bought all the “stuff” for the base/clear coat.. ah $425 .. I’m quite used to and pretty good shooting good old Imron.. Let me set the stage.. it’s been about 60 degrees at 8 am the past few days but very windy by mid day.. So yesterday I got all the base color laid down and only a couple mishaps that were easily fixed. I usually use a little “repair” gun for bikes and rarely have used my big full qt. cup gun. But after adjusting the fan pattern and the air pressure it went OK. Now I’m told that I have to shoot the clear within 5 hours or I have to wet sand the car again.. OK the wind is still not too bad and all the scurrying about has me warmed up and I’ve not even thought about the ambient temp. The directions say two med-wet coats. OK Well not really, the clear is not flowing out because its too cool outside, if I try to make it wetter it just runs. what a mess, what a waste. Well, I guess a learned a lesson and that won’t happen again. Or I’ll just let the car guys do the painting! here’s a trick I learned after the fact for you DIY outsiders.. Put the paint in the microwave and warm it up first…why didn’t I think of that? I’ve put catalyzed paint in the ice box overnight to slow it down. I’m going to wait until this week of high wind speeds blows through and after a day or two I’ll wet sand it out, being very careful to not go through the color coat! And try it again when the conditions and pressure are better.. Here are my disappointing results..
Wet sanded/blocked all the orange peel last evening. Actually it wasn’t a bad as I’d expected. It doesn’t have to be perfectly flat as the clear will fill what I’ve left behind. There are tape markers where I went thru to the primer. This morning I’ll go get an adequate amount of a less expensive urethane clear that has a slower flash time. I thought initially that it was the temperature that was the reason it didn’t flow out.. nope, it was setting up too fast. Good for spot repairs, but not for an overall car shoot. I’ll get a pint of color and fix those spots. Then I’m going to tarp off an area in the shop to paint it indoors. I have a couple big floor fans that will help. This isn’t the “right” way to paint a car, but it’s a one time deal… till the next one ;~) I’m also going to get a small can of reducer for the clear, Just in case I’m wrong about the drying time. Don’t want to sand it again!
The ’60’s circa dash panel arrived yesterday. It has had an extra instrument hole cut in it. I’ll either weld in a patch or add an ammeter or voltmeter… a work versus money decision..
I’m beginning to think this car is jinxed… Spent several hours repairing the dash and the paint went south on that too.. Monday last I had a professional painter friend come over to do the clear coat (I’m tired of messing it up) Well, he didn’t have much better luck. The back half of the car is fine, but the front half has water spots and enough hair and dust to make it in-salvageable. So I’ll sand it down again. This time I’ll just take the front fenders and hood to his shop where hopefully it’s not as dusty or dirty..
This has gotten out of control as a fun project. I decided to just re-shoot the front half here, but out side again, instead of taking them to the other shop. I may have also decided to leave it as a Midget variant. The Sprite dash is going to be a PITA and requires new larger diameter instruments. Remember I was going to keep the drive train and recycle the rest at the beginning and I’ve already spent too much money just to make it presentable. So today’s result is OK, probably better than the back half now. I did get a couple small runs in the clear, but they will buff out and be just fine..IMHO. Here’s it is pre buffing..
I must say that the painting turned out to be a frustrating addition to a skill set. Most would agree that they want the best result from their skill level. Well, where does the practitioner say enough is enough or that is not or is good enough. What about the parts and pieces that will be mounted on or adjacent to this shiny new paint? Personally I wanted the paint to look really good so when someone asks “Where’d you have it painted?” I could puff up a bit and say “Why I did it myself in the drive way” The reality is that now I have to spend extra time or extra money on the rest of the rehab to match the quality of the paint work.
Here it is with the fenders finally bolted on and the repaired grille in place and ready for the wiring and plumbing work to commence.. I thought about “making it run” for the first time today. It’s been here for 9 1/2 weeks now and if my real job doesn’t get in the way perhaps it will be on the road in another 2 months.. give-r-take
The head light buckets were total trash in the original car. I spent nearly 6 hours repairing and piecing and polishing up my “cleanest dirty shirt” assortment of parts to get the two I finally installed..
Well, I was running out of things I wanted to do next so I decided it was time to think about getting the engine installed and running. So I moved the power-plant to the other bay and drained the oil as I wanted to drop the pan and inspect the bearings before it went back into the car. I had turned the engine over with the starter motor before it came out to check for compression and ugly noises and it made sorta OK compression (for a car that had sat for 20 years) and I didn’t hear anything bad. Well, you guessed it, after the pan was off I saw the oil pump screen was coated with chewed up bearing material. Yup, number 4 rod was spun. Damn, I hate it when that happens. I think in the interest of time I’ll use an available re-built engine and deal with this one later. It just means more money to spend now, but it will give me a better sales pitch for this right now. When I had separated the gearbox from the engine I found the carbon facing on the release bearing gone and had assumed that the owner couldn’t put it in gear and had simply parked it for that reason…
but, here is the real reason it was parked..
In the meantime, even though I have a miserable summer cold, I have the rest of the dash instruments installed and wired up. The harness I got from my trusty British car parts wholesaler is very close but not quite right for this year of Midget. It’s missing a couple grounds so I’ll get them made up shortly and that should make the dash lights work. Also the seats are back from Jim and Jerry Tanny’s upholstery shop. I can’t bolt them in until the carpet is down.. another semi big job for me.
The good news today is that the rebuilt engine arrived today. It used to belong to a Austin Healey club member in the Chicago area. He was traveling to one of the Healey gatherings on the West Coast and spun a bearing. A local Healey club guy gave him a spare he had and the Chicago guy paid to have this one rebuilt. So it’s just been sitting for a couple years waiting for a new home. I’ll eventually rebuild the one from this car when the urge and sufficient funds move me to do so. Here’s the most recent pictures.. The club guy recalls that the head had been modified. I measured it as best I could without removing it and well, it looks pretty stock to me. It is a later head, that had air injected into the exhaust ports, but no signs of porting or polishing or even much if any removed from the height dimension. I do know that the push rods all hit the rockers off center. I’m not sure if I should be concerned or if this was purposely done to make the valves rotate more. I checked a couple others I have in the shed and they all seem to be about half this way…. ??
I’m thinking about painting it gold. British Motor Corporation had a “Gold Seal Replacement” program for their replacement power plants. And they were painted a sort of gold color. I did this once before on one of my Bugeye Sprites and I liked the way it looked and it was always a good story to explain why it wasn’t the “proper” engine color…
Well, I’ve gotten ahead of the story line. An able bodied friend arrived and we dropped the engine/gearbox into the chassis before I took pictures of the gold engine block. Well, you get the idea. I rebuilt the carbs while the paint was drying. Even after several hours in the carb washing machine still most of the black oxidation was untouched. I gave it my best shot. It won’t affect the operation any, but clean and shiny is often good for another 10MPH ;~)
I got the engine running yesterday. It was a bit disconcerting at first. Though I tried to get some oil pressure just spinning it with the starter I couldn’t get any reading and was worried I might have to pull the engine to see if it had the correct pump (which I’d assumed was done when the engine was rebuilt) I tilted the car, I squirted oil into the oil lines still no pressure. Finally I removed the sender line at the block and it squirted out like a geyser. Turns out the 20 year sleep for the gauge was the problem. I gave it a few sharp taps and it finally started to register. It still sticks so I’ll pull it out and get it serviced.
Though I marked the crank pulley with paint I still couldn’t see the mark to set the ignition timing. So I put it in 4th gear and pushed the car to rotate the engine…. except nothing happened. What now! I checked the gear box before I bolted it up. It was fine, but now no connection with the engine. I’d replaced the pressure plate and clutch disc since the old stuff had the chewed up release bearing. I know I installed the correct release bearing?? What I hadn’t done is any service to the slave cylinder. Well, geeze, no wonder the old release bearing was so worn, the push rod the previous “mechanic” had made was over 2 inches longer than is specified for the 1275 series…
In the above picture, the correct push rod is the short one, the bottom most one is what was in there and perpetually holding the clutch in a partially released condition. I’ll get this re-installed and I hope to have the use of the gearbox afterwards.. I should have done this when it was out but sometimes I can’t get it through my thick skull exactly how stupid some mechanics/owners are…
This is the only current new picture from this week.. The carpet, panels, and seats are in. waiting for some weird packing pieces to install the top frame and add the new top… I’ll have more soon.. The car is running down the street and sounding good.. Oh yeah, the windshield and side glass is in as well. Now sporting a full tinted windshield…
OK, now it’s starting to look almost finished, eh? New tires all around and spare too. A few more interior trim items and the new top and I’ll head to DMV for the title hassle I’m sure to encounter..
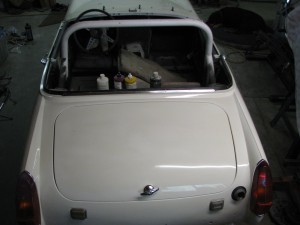
Here it is in pretty finished condition. I’m still awaiting a State VIN inspection so I can get the title work completed and then I can do some legal driving to shake out any problems that may surface..


