Another Auto of Interest

Posted on August 6th, 2015 by Dave under albuquerque custom cars, auto restoration, Uncategorized.


1954 Arnolt Bristol

1954 Arnolt Bristol

Well, I’d heard the name before. Usually I’d thought of them as a British built variant. Like the AC Bristol or the MG Arnolt. I recently learned about an Aston Martin Arnolt (by the way, I want one of these…)

Historically it’s an interesting tale. Starting at the end of WWII as part of the war reparations acts the British were awarded access to many German manufacturers. Essentially the underpinnings are BMW mechanicals. The engine is, I’m told based on an aircraft engine. The engine featured a slightly modified version of BMW’s six-cylinder pushrod engine of 1,971 cc (bore 66 mm, stroke 96 mm). This engine, considered advanced for its time due to its hemispherical combustion chambersand very short inlet and exhaust ports, developed 130 horsepower[1] at 4,500 revs per minutes. In order to maintain a hemispherical combustion chamber, the valves had to be positioned at an angle to the head. In order to drive both sets of valves from a single camshaft, the Bristol engine used a system of rods, followers and bell-cranks to drive the valves on the far side of the engine from the single camshaft. The car weighs in at around 2100 pounds, so acceleration was brisk for the period.

2 Liter BMW

2 Liter BMW

There is  nice write up here  www.danjedlicka.com/classiccars/arnoltbristol.html rather than me writing it again. Hmm, can’t get that link to link.. copy and paste might work??

This car was recently purchased in Sweden and arrived at my door with some brake issues. Leaking front wheel cylinders, worn linings and rusty Al-fin drums. The brakes are Lockheed as fitted to Jaguar XK 120 and 140 models. The fronts are “self adjusting”, well maybe  ;~)

As is usually the case many of the original parts are missing or have been bastardized in some way. Now begins the time consuming task of gathering the right stuff, which are as rare as hen’s teeth in most cases.

The new owner hopes to use the car for European invitational rallyes and prestigious US based shows. It will likely draw  crowds due to it’s rarity.

Front end view

Front end view

IMG_5521


Comments (0)

A new old toy for me…

Posted on November 24th, 2014 by Dave under Austin Healey, auto restoration.
Tags: ,

As some of you know it was necessary to sell my “collection” of fun old cars to satisfy the demands of my divorce last year.. The results of which left me on a bit of a financial shoestring.

I knew I wanted something to bang around in and take to the club meetings or even a few laps up at the race track. The first affordable possibility was a ’60’s TR4. It had sat outdoors for years and had been stripped of most everything..even so I drug it back to the shop thinking I could take my time (probably years). I stared at it for a few days, even pulled it indoors for a start at cleaning all the crud out of the body work. Then the light came on.. WTF am I doing.. It would have cost a fortune to restore (don’t they all!) It needed every single part to be worked on, replaced or repaired.. I called the tow truck and had it shipped back to the owner..

Then, one sunny day, a friend I’d recently met told me he was going to purchase a car that I had referred to him a few weeks earlier.. It was a 1968 Triumph GT6+. Visually a sort of attractive automobile. I had no great love for Triumphs of the “spitfire” series. I have always been disappointed with the marque in general. Saw a fellow roll a TR3 in the 60’s and be killed, my father always groused that they rode like a buckboard, I always disliked the Rube Goldberg front suspensions/steering, lack of HP from the TR6’s.. in other words they didn’t float my boat. Well, he sent me pictures of the car, which I knew a little about having belonged to a local LBC club member. This member had decided he wanted the car the factory never built. A Spitfire with a 6 cylinder engine.  The 6 cylinder only came in the fastback enclosed bodywork. Well he set about taking a very nice example and removing a lot of parts to make his “Spit6” and this car was left outside for about 12 years before he sold it to another enthusiast, who parked it his his garage for a couple years before selling it to my friend. Here’s a couple pictures as I first saw it..GT6 1DSC03048

It was sitting pretty forlornly in this guys garage. The exterior trim had been largely removed and the paint was badly oxidized from sitting in the sun.

GT6 4DSC03044

The interior, especially under the dash, had been disassembled. The original seats were missing and a pair of Miata seats were there, but not yet installed. Apparently, that is a popular up-grade? Here’s another shot.GT6 2DSC03047.

Maybe they are good for the Spit6 or straight Spitfire, but even with them sitting on the bare floor, my head rubbed the head liner and I’m not a big guy. Under the bonnet (hood),again, a number of items had been removed. Here’s the only picture taken on the day it was picked up..GT6 3DSC03045


Well, much like the TR4 at the beginning this car sat for a couple months, mostly in my way, in a corner of the shop.  I just could not wrap my head around the idea of owning a Triumph after all the years of mostly negative Juju. Friends and customers would comment all the time.. ” I like the lines”, “..a paint job would be easy now” ,”parts are available from so and so” and so on. Well, I was at the painting supplier one afternoon and thought I’d get a new bottle of aggressive compound and spend a couple hours seeing if the paint would clean up some. As I was quite sure I wasn’t going to strip it for a proper re-spray. And here it is after the first pass..IMG_4942

Well, that put a new spin on it. I next set to getting it running. Fresh gasoline, new battery, some cursory wiring, an alternator, a fuel pump…well, quite a bit of stuff as it turned out. However, it started up and sounded great mechanically. The exhaust was a pair of undersized glass-packs and it was way too loud for the highway, sorta OK for short around town runs.

The Rotoflex couplings (the Triumph half solution to proper half shafts or CV joints) were replaced. The differential howled at any speed over 60MPH and was rebuilt at great expense. New tires were mounted. I had subsequently purchased 2 more GT6 “project” cars, from which I was able to harvest a lot of the missing trim and interior bits. The good news is that the gearbox and the overdrive were good to go. The interior carpeting and panels were either replaced or repaired. I just wanted to get it to a decent state of respectability and reliability.  So as it is today, after about 200 hours and a couple grand in parts this is what I have. A nearly rattle free, spunky, fun to drive, eye catching little British gem. It actually gets more comments from other passersby than my really nice Healey 100 did. Who knew… Here are a couple more pictures..IMG_5049IMG_4964IMG_4966IMG_4965

Perhaps over the winter I’ll consider new carpeting and all the upholstery and a new paint job by springtime.. Right now I’m enjoying it and turning down offers to sell it.. Who Knew


Comments (0)

Moss Motors write up… sweet

Posted on September 26th, 2014 by Dave under Austin Healey, auto restoration.
Tags:

http://www.mossmotoring.com/shop-focus-porter-customs/

Comments (0)

Grace, the Healey from Heaven

Posted on March 31st, 2014 by Dave under Austin Healey, auto restoration.

As many of you know or should, Grace is a now famous old ’53 Austin Healey which travels the US visiting children with a generally terminal cancer and their families. Grace and her care taker (John Nikas,  Drive Away Cancer on Face Book) have been dropping in at my shop for all the years that John has undertaken this truly marvelous project.

Grace has had some health problems of her own over the past 17 months. The past months have been used to slowly collect the necessary parts, some by donation and some from John’s own pocket to get Grace back on the road again. Seems that the past 150,000 miles she logged eventually holed all four pistons, wiped the cam lobes, and cracked the crankshaft to name a few.

The car was towed in from Iowa last week by Jim and Judy, an Arkansas family, who have taken up the slack with a Triumph Spitfire while Grace was on the mend. No, they didn’t tow it with the Spitfire.. Syn is the owner of Ginger, another DAC car who accompanied them on the cross country trek.

Here are a few shots of Grace as she sits today:

Looking a little forlorn

Due to the modern rear main seal and fitting the back plate it is easier to not use an engine stand at this point though my knees would argue..IMG_4751_1


The deck has been milled so many times that the pistons now protrude 0.042″ above the deck height. The steel head gasket measures ~ 0.060″ Pretty close to the head, but modern engine building dictates that zero tolerance is OK. This creates a “quench” zone, which keeps carbon build up to a minimum. The rod “stretch” is in the 10 thousandths range, so no worries on this build. Room to spare here. Modern piston design nearly eliminates any piston slap. The crank design has two additional counterweight throws and no offset, so this engine should easily rev well beyond the original 4800RPM red line. Sweet.

Misc. parts awaiting re-installation.

We are waiting for some parts from England that have been lost somewhere between Iowa and here. We hope to have Grace off life support before the end of the week. I’m going to eBay a bunch of misc. items to help cover some of my out of pocket expenses. Keep your fingers crossed if you are following the Drive Away Cancer thread on Face Book.

As it sits today. new wiring harness and LED lamps installed.

As it sits today. new wiring harness and LED lamps installed.

Just bought a new Windows 8 computer and switching computers has created the usual mess. I’ll try to get it sorted out. Suffice it to say that Grace is up and running and sounding healthier than ever.. more to come.

Installing the rebuilt engine

Installing the rebuilt engine

Starboard side

Starboard side

From a purely seat of the pants calculation I reckon that Grace is now making a bit over 130HP. It started with 110 in it’s 100M form, the small quench zone added 16HP according to the machine shop, the lightened reciprocating mass and the increase in bore and the lightened flywheel and sundry other items should get it there. A dyno test would be nice, but that isn’t up to me.. The best part is that it should be much more durable. On the busy freeway it was showing 105MPH in 4th gear at 5200RPM and still pulling like the  proverbial locomotive. With the Overdrive engaged I would guess 130 plus is possible. I’d like to drive it at sea level! We’re a mile high here.

Well that about wraps up this saga of Grace’s travels from my perspective. She and John are heading for NC in the next week, so we’ll see how it goes and what effect the rebuild has on gas mileage, which wasn’t especially good before.  Watch the DAC link above for the next reports from John.


Comments (0)

French autos of interest

Posted on March 1st, 2014 by Dave under Austin Healey, auto restoration.

1955 Talbot Lago Grand Sport

Click on pics to enlarge-arrow back to text


Ou la la…  This is a nice vehicle, despite its French origins. A big 4.5Liter straight 6, with twin cams in the block and triple Solex carbs. The other neat feature is the Wilson or E.N.V pre-selective transmission. Move the column mounted lever to the gear you want before you want it. Push the “clutch” pedal and it’s in that gear. Takes a few minutes to acclimate to thinking ahead, but it’s really pretty clever. It’s originally a British design, but Lago bought the patent rights in the early 50’s and made some minor changes.

Unfortunately, the reason it’s here is that the reverse selector is on the blink. The engine and gear box must come out to rectify the problem. It’s a very expensive bit of sheet metal to have to work on. Only 19 of these cars were produced!

Here’s a shot of the engine..

BIG Six Cylinder 4.5L

Here’s the driver’s seat view.. By enlarging this shot the gear selector is clearly visible on the right side of the steering column.

Interior picture

And here’s the offending gearbox innards. Each of the block like structures on the left side are the selectors for the respective band operated planetary gear sets. The reverse is the bottom left most..

E.N.V. gearbox in neutral

And here’s a couple more shots of the car.

Rear quarter-my favorite

Front view

Comments (0)

Valve job.. ’57 Maserati 3500GT

Posted on April 7th, 2013 by Dave under Austin Healey, auto restoration.

You’ve probably already seen some pictures of this car herein previously. According to Maserati build records only two of these cars were built in 1957, so it’s VERY rare!. Here’s another look.. click on photo to enlarge-arrow back to text.

1957 Maserati 3500GT Paris show car-really!

Well, as good as it looks, I became concerned that the car simply was making too much induction noise at highway speeds to make it a comfortable “touring” car. I let it go for awhile until the owner and his wife both agreed to let me at least check the cam timing to see if it was off to the degree that valve overlap would allow poor filling and emptying of the cylinders yielding a lot of  Ross Perot like sucking noise. Well to my surprise the timing was a few degrees advanced on the exhaust cam, but probably not enough to cause the symptom we were experiencing.

Most manufacturers have very clear and well defined marking showing where the engine should be timed for optimum daily usage. There are many variants to this setting for specific racing needs. Maserati, and now this is my wild ass guess, ran in  the engines before delivering to the end user, and this one being the “Factory” show car that year probably had Guido or some engineer do a little extra tuning. I say this because the marks on the cams that should coincide with the marks on the retaining caps were hand scribed with an electric pencil and labeled “PM” with an arrow.  See photo:  followup note: no, I’m told by all the experts that this was the way they all were..

Factory markings?

I felt that the engine “ran” pretty well as it was and rather than spend many hours to set the exhaust cam to where one would think it belonged I decided to check some other parameters for the issue. First was to check the compression reading, note to self: (ALWAYS DO THIS FIRST YOU HARD HEAD) well, the reading were horrible, 5 cylinders were at 60PSI or less and only one cylinder managed to get to 100PSI.  The compression ratio for this beautiful engine is only 8.2 to 1, nevertheless, even at Albuquerque’s altitude I would expect no less than 150PSI on all 6 cylinders.  The carbs were “chuffing” out air at various RPM’s, not unlike many 911 Porches tend to do. I’d recently had a friends TR4 with a similar presentation and that was severely receded valve seats. The seats are generally pressed in and are the seat upon which the face of the valves rest to allow the pressure of compression to occur as the piston moves. Warnings of seat recession was widely spread with the demise of leaded fuels, but that never really materialized except in a few racing engines that weren’t properly built with hardened seats and valves to handle the new unleaded fuels. Remember that “valve jobs” were the most common repair and bread and butter of shops before unleaded fuels. Now I see maybe one or two a year.. sigh..

OK, so the owner gave me the go ahead to pull the head off as see what exactly was causing the lack of compression. First the valve clearances were all over the map. The Factory called for 0.1 mm (0.004″) intake and 0.2 mm (0.008″) exhaust. The readings were as wide as 0.013 to 0.0, only 2 or 3 of the 12 were close.. The valve clearances are set by means of hardened discs of different thicknesses between the valve stem and an upside down “bucket” that is opened as the cam lobe rotates.  Well, the good news is that the seats don’t appear to have much recession, but they will have to be reground and the valve faces will need to be re-cut. I have not pulled the valves out of the head yet so I can’t report on the condition of the valve guides, springs etc. Here’s a shot or two of the removed head, block, and all the miserable silicon that some previous mechanic used to keep the coolant from leaking out.  Tedious job to remove it..

wet liner cylinders, tiny brass(?) combustion seals, Silicon mess...

Head and Carbs on the bench..

top side with cams still in place- note dual spark plug design

note difference in operating temp of these valves.

Next, I’ll disassemble the remaining removable bits from the head and deliver it to the machine shop…  The head is at the machine shop for their part of the job. Parts are ordered and I spent several tedious hours today cleaning up the block deck and liners of all the silicon schmutz and gasket remnants.

cleaned and ready to re-seal and add coolant gasket

The starter has been sent to the re-builder to check for condition. All the new compression may be more than a tired starter can handle and it’s a PITA to remove when the carbs are installed.. ditto the oil filter..

While the head is at the machine shop I’ve started to do some general clean up and repairs to other under the hood items. First on my list was to blast the 2 exhaust headers and then coat them with a graphite product I’ve used for many years with nice results. One of the headers was wrapped with heat cloth tape the other none. Turns out there was a reason. The rear wrapped one was nearly cracked in half on the underside (luckily). Being of cast iron construction they are problematic to repair without special  mostly Nickel alloy rods or high silver content brazing wire, which I happen to use for the bicycle department. Here are some pictures of this process.

Badly cracked rear header-click on this

Raw repair prior to surfacing

Double click on this one above. There must be about 3 troy oz. of silver in that repair..

finished and coated front side

finished and coated backside with repair

Then I spent the rest of the day removing the old paint and cleaning up the cam covers of casting flash and other imperfections. I polished the raised lettering and outlines and finished with a new coat of black “wrinkle” paint as was original. The owner wants the letters painted red as was done previously, but I may try to talk him out of that, as I think the black and polished aluminum looks classy enough. We’ll see.

restored to like new--well, almost..

So I’ve been pondering this next picture. It is a straight edge laid across the tops of the wet liners with the copper “fire ring” sitting in it’s normal position. The gap you see back to the deck is nominally 0.087″ which is huge in my thinking of what the outside perimeter gasket to seal the coolant jacket, is capable of. Perhaps this is why there was so much silicon used by the previous builder. I haven’t received the new gasket set yet, so I’m in the dark until they arrive. The old one is visible in the earlier picture of the underside of the head and I think we can all agree that it isn’t that thick.. a conundrum..

wow..tiny text.. click on twice?

The most simple (cost effective) solution is to have a shim or spacer, whatever one cares to call it, water jet cut and surface ground out of sheet aluminum to the correct thickness. This will return the deck height to the same as the wet liner height.  I can use the rubber perimeter coolant seal as a template as the spacer is not terribly dimensionally critical except for the thickness. This will also correct the overall height of the cams which will bring the valve timing back to original. Pretty sure that I can have it done locally, another plus.

Yesterday I cleaned up and painted the cam cover end plates, oil filler and tach drive plate.

More assembly prep work..

In the process of changing the oil filter cartridge..

old oil filter cartridge

I found this along with a fair quantity of silicon

collapsed internally

sealant remnants that had migrated into the lubrication pathways.. The filter had imploded and was not filtering much of anything. God only knows how much of the filter material has migrated and is possibly blocking the oil passages or bearing feeders… what next?

Yesterday I bought a sheet of 3031 Aluminum sheet at 20 Ga or 0.032″. I was hoping for 19 Ga (0.036″) but couldn’t find it locally. Nevertheless, it’s in the hands of the water jet operator along with the template for the spacer. I’m confident that with a light coating of sealant on both sides plus the OEM gasket the height will be within the allowable factory variation spec. (+/- 0.1mm [0.004″]) Regardless, it will be FAR better than what I started with..

Here’s a couple more shots of the cleaned up engine bay, the water pump and the very unique leather wrapped oil line.

Driver's side

passenger side

Water pump

Leather wrapped oil line for dash gauge

The owner dropped by with a couple hardback Maserati books and I found a picture of the early 3500 engine and in my meager attempts to bring the car back to it’s  original appearance I noticed that the water pump was also black wrinkle paint finished, like it is now..

Factory finish for the water pump

still waiting for the machine shop to finish…

Here’s  today’s new issue. The old tach drive cable had broken at the engine end. The female screw cap that mated to the male cam cover plate had broken at some point and the cap was replaced with workable bracket that kept the cable inserted into the back of the cam. The new cable and housing look to be just the ticket, but the overall length of the square cable is too long. Ask any instrument repair shop and they will tell you that the maximum insertion into the back of a mechanical tach or speedometer is 3/8″.  This new one is ~ 7/8″ too long and would instantly ruin the tach. Plus it has no retaining collar to keep the cable from migrating into the tach. Luckily we have a nationally respected instrument repair shop (MoMa) about a mile from me. I’ll run them both over this morning and confer with Margaret and Joey and see what the best fix is. Here’s some comparative photos.

top=old / bottom= new

top=correct insertion length, bottom too long! Note collar on top cable

engine drive ends. Note missing retaining flange on top cable.

Finally got back to work on the Maserati this last week. I got two versions of the water jet cut spacer. One was 0.032″ the other was 0.40″. Here’s what it looks like..

Head spacer and gasket

And while that was being cut I managed to get a factory fan. It has 6 blades, the car has some Japanese single blade, no doubt why an electric fan had been added. The new fan was taller than the radiator shroud which was dead flat. I un-soldered it and and beat it into submission on a sandbag and then English wheeled it into a fairly pleasing radius that cleared the blades. Hmm, the “program” won’t upload the shroud picture I want, so here’s how it used to look instead..note that the blade it pushing up on thee shroud.

A bit of a clearance problem...

The machine shop finally called and informed me that they would need 6 new intakes, 6 new exhausts and 12 new guides.. apparently the seats were acceptable. It was decided beforehand that they would disassemble the moving parts of the head so they could measure stem lengths and insertions etc., should they ultimately set the valve lash at their establishment. I ended up doing it since I’ve done many similar heads before and they hadn’t. The two numbers they provided for each bank were useless.. It took nearly 14 hours to get them to plus 0.002″ of the factory spec. An extra 0.001″ was to allow for the seating in of the pads and valve seats. This was the machine shops idea and sounded like a reasonable idea. It took this long because my assortment of shim pads was mostly from Jaguar heads and their pads tend to be much thinner that these Italian ones. So I had to spend many extra hours using my old Sioux valve grinder to grind thick pads to the correct thickness..  After a good nights sleep and with some help from my pal Bruce (HVAC expert) we installed the head perimeter shim atop a coat of Yamabond (a product for sealing the crank case halves of a motorcycle). It goes on evenly and it cures slowly giving us plenty of time to install the rubber perimeter seal (~0.075″) and the 13  (0.050″) ball bearings that nest in precut holes in the rubber seal. These are to keep the rubber seal from squishing out under the 100 ft lb torque applied to the head (I stopped at 95 ft lb) So, after hooking up fuel lines, oil lines, power lines,water lines, linkage, Ex manifolds and the cam covers, cap, tach drive and sundry other time consuming tasks I got the old oil and coolant drained out. Almost ready but, I forgot that I had to reposition the cam timing so the opening and closing was at factory spec. Remember I’d thought this was the issue causing the loud induction noise.

Splined keeper and pin for cam adjustments.

Here’s a look at the new valves..

The green thing is just holding the head for it's picture.

So now for the “bad” news…. I checked the compression before starting the engine and to my disbelief it was nearly as bad as when this project was started. A second confirmation with a leak by tester showed that even with new valves there was up to 75% leakage. Mostly it turns out through cracks throughout the head it self. I pressurized the cooling system and had coolant coming out the exhaust ports. Couldn’t see it on the intake side due to the big Weber’s, but I could hear the air escaping…. Well, what the f… do you do now? Just the previous day I’d informed the owner I expected to see another 100HP.. We weren’t able to “pressure check” the head when it was off because there were just too many holes to start with. I’m thinking that that cracked exhaust manifold may have been caused by the coolant leaking into it. Maybe? Anyway, I put some sealant (Alumiseal) in the radiator and fired it up. Started on the 2nd rotation. Ran it through a couple heat cycles while I picked up and put away nearly every tool in my tool boxes. Then I took it for a short test drive…. Unbelievable is all I can say. This thing flat ass runs. About 90KPH in one block and only half throttle. This engine doesn’t need any stinking compression… I can only imagine if it was at 100%. Yikes! OK I digress. I had the owners come drive it and before it ran out of gas on them they confirmed that it was mega better and quieter too. ;~)

Note: Now that all the dust has settled..I went back today (after it’s been driven 50 miles, head re-torqued, etc.) I got out the compression gauge and checked it with the engine at just off idle and the readings were 150PSI, so that confirms my thinking that the valve overlap was just too much to overcome at cranking speed. I feel better and it will certainly ease any fears of near future problems for the owner..Happy days.

Here’s the new look, well here’s the before pic..

Engine compartment ~Oct. 2012

After the valve job/clean up May 2013

Dolled up 1

Dolled up 2

don't mix up the ignition leads!

Dolled up 3

So what are we going to do about the engine..? Nothing for a while. There are some 3500 heads out there at reasonable prices, my choice is to find a complete engine to rebuild, but the Paris Car show provenance may negate my wishes.. Let’s play it by ear.

I need to install some seat belts (5 point harnesses if I had my way ;~)) and fix some steering wheel cracks… otherwise this story is a wrap. Feel free to email me ( About on the home page or leave comments below)

This was a fun one… dave

PS Let me add a few comments about driving this car. First I can only start to imagine the visceral thoughts that Moss and Fangio and other top Formula I and sports racers must have experienced using this power plant in a race car chassis. Did I mention this is a completely tubular frame? Boosted giant Alfin drums on all 4 corners and a gear box that begs to be shifted just for the sheer joy of it. The torque is prodigious for an Italian car and the engine noises are priceless. It will rev to 8000 RPM… happily (note to owner No, I didn’t push it that far). Did I mention it is an all aluminum body? Absolutely no body roll in fast corners and a nice steering ratio once under way. The Maserati brothers did well with this design. Hope some of you get an opportunity to get a drive or ride in one of these drop dead gorgeous cars..

dp

And as an added bonus, here’s a U Tube clip a friend sent me of this very car a year or two before the current owner bought it at auction.

http://www.youtube.com/watch?v=NgD4kRL45H4

Comments (0)

Repairing the Beast

Posted on March 17th, 2013 by Dave under albuquerque custom cars, auto restoration.

I’ll start with a picture of a beautiful 1966 Aston Martin DB6.  One of Newport Pagnell’s most beautiful cars. This one is a Superleggero or in other words “mostly aluminum bodywork” . The car spent most of it’s life in or near Monterrey , Mexico.

Click on pic to enlarge, arrow back to text….

The beautiful beast

The new owner bought the car from a reputable outfit near Scottsdale, AZ.

While driving here in Albuquerque, upon applying the brakes at a stop sign the right rear wheel fell off and caused some ugly damage to the rear quarter panel. Apparently some nitwit had installed the splined knockoff hubs on the wrong sides. So rather than self tightening, they were self loosening.. Exchanging the (presumably) removable hubs in the end required swapping the entire axles since the tapered and keyed axle spines would not let go of the directional hubs. This was a fiasco in and of itself as the brake caliper brackets were trapped between the hub and the axle bearing casting and when reversed to the opposite side the also trapped fastening bolts were no longer matching in correct lengths to reattach. A hack saw took care of that but in the process of doing this job I noted to the owner that the rubber bushings in the solid rear axles 4 link attachment to the chassis were all badly worn and that one of the lower links attachment “tube” was completely adrift from the chassis.  No doubt the loud clunk we heard from the rear of the car. See picture.

floating pivot carrier tube

Both of the lower tubes had been (poorly) welded with brass. I have to assume that the car was hit in the rear or spun backwards into an immovable object and necessitated the re-welds. Brass being typical of a poor Mexican repair.

This repair required removing all traces of the brass from the tube and the chassis box. Difficult as the tube was half in the chassis and access was limited. I used ~ 3/16″ thick hardened steel kingpin shims to reattach the tube on the right side. The left side was still sound so I decided to leave well enough alone, but the previous repair left that carrier at a less than perfectly horizontal angle.

MIG'ed repair with steel reinforcements

With that accomplished I moved on to the 3 remaining pivot bolts that were rusted solid in their receivers that carried the other bushings.

Grunt labor

Each of the three required a full day of drilling and removing the bolts with rotary burrs and all the while not disturbing the carrier tube they passed through!

I had my favorite machine shop make new pins and we also made the lower links adjustable to account for the non horizontal position of the one remaining lower pick up and to allow for a little pre-load on the pinion angle to reduce rear end squat and squaring the rear axle with the front wheels.

Now adjustable lower link

Another angle..

The original factory rubber bushings were replaced with black Delrin, a permanently self lubricated plastic product that can be machined. We also made Delrin washers to limit thrust movement of the bushings.

While this was happening I had shipped the Aston Martin’s “selectimatic” Armstrong lever shocks to my friend Peter Caldwell’s World Wide Automotive in WI  for overhaul, as they were leaking badly and would no longer operate from the dash control knob.

All in all a pretty intensive project, but one that had to be done to keep the car on the road and once you’ve experienced one of James, …. James Bond’s  cars there is no other conclusion.

Next project is to renew the Watt’s linkage bushings with Delrin… Hope it’s easier than the last!

dp


Comments (0)

Healey Joyride 2012

Posted on November 11th, 2012 by Dave under Austin Healey, auto restoration.

We had an enthusiastic group of, well.. enthusiasts participate in a rallye though the mostly North valley of the metro area.  Going as far as the Santa Anna Pueblo in that direction and just South of Central Ave in the other. This is part of my yearly drive to raise some money to purchase gloves, tires/tubes, and similar stuff for our wheelchair bound Vets. The cars ranged from a 40’s Chrysler Airflow to a new Porsche Boxster. We collected $275 and would have done better had the local weather forecasters not deemed the weekends weather to be “wild”. As it was there was 2-3 minutes of light rain at the start line, some wind gusts and on and off periods of cloudiness. There was a lighthearted attempt to impeach me as the rallye master as I missed the correct name of one street, nevertheless all found the finishing point where we enjoyed burgers and mostly coffee.

Typical blustery fall day

Click on pic to enlarge-arrow back to text..

Rolling along in a TR4

At one point a rallyist asked a Santa Anna Pueblo resident for directions at which point the gentleman offered an unsolicited  donation from his pocket after being told what the rallye was for. How cool is that. Good Morning America, I’m a native son. Thanks all! Dave.

Comments (0)

Cars I like

Posted on November 9th, 2012 by Dave under Austin Healey, auto restoration.

I’ll start with a picture..

Hot blooded Italian

3.5 liter straight 6 twin cam with 3 Webers and dual plugs. Everyone should have one of these. My only complaint is that in Italian fashion it is a short stroke and requires a lot of RPM’s to make its 220 HP

This car was the 1957 Paris show car and has a few extra pieces of chrome and at first blush is perhaps more of a ladies favorite, that is until one drives this car. It has a tube frame and for it’s era rides and handles about as good as they got. Stays dead flat through hard corners. The gearbox is a delight and the pedals work so well I’m amazed it’s Italian. The vacuum assisted brakes are at times over-boosted, but when the tempo is pushed they too are a joy. Hope you all like it.. dp

Cockpit view-obligatory Nardi steeringwheel

Comments (0)

Losing my mind?

Posted on March 12th, 2012 by Dave under Austin Healey, auto restoration, For Sale.
Tags: ,


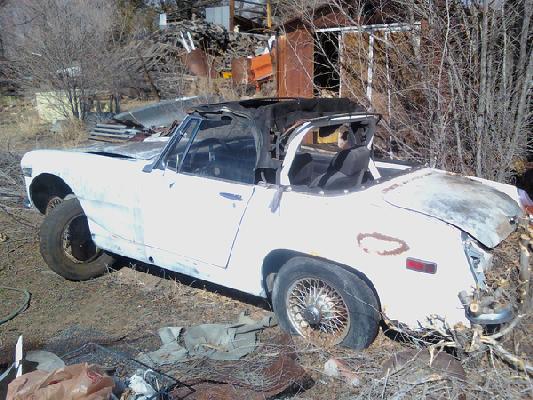
A very forlorn MG Midget

Note; click on pictures to enlarge. back arrow to return to text.

My insurance agent called a couple weeks ago and told me another client had to be rid of a MG for her mother’s estate.  It was nearly 100 miles away and not even a “B”. The pictures they sent were pretty discouraging and there was no title, but it did have a 1275cc engine and gear box. I gave her $100 for the “parts” and $200 to the tow truck driver (Tom-a good guy) and next had to decide what to do with it. Part it out, build a race car or restore it..

The floors had rusted through or nearly so..

Drivers seat? (click to enlarge)

But as I mentioned it did have the drive train and only 36000 showing on the odometer, which works, but the engine was not original color so its been out and did I mention that the throw out bearing was missing the carbon/graphite face and probably was parked many years ago for that reason.

It all seems to be there.

After several days I have most of the paint off the body and engine compartment. The trunk area is pretty much OK as is.

Dirty job..

Hammered out the tree damage to the rear..

new floor pans, sills and cross members

I glued the new pieces in with a 3M bonding mastic for this purpose. A first for me. I don’t like it. It’s very expensive, requires more prep work and needs 24 hours to fully cure. I still have to repair the bottom edges of  both rear fenders and I’ll just MIG them in as usual. I understand that the insurance co.’s require the glue for new vehicle repair..

Well, as things would have it, I had another glue cartridge and decided to go ahead and use it up.  So here are two methods for gluing repair panels. The small one is probably the superior method. Cut to size, flange the edges, glue and clamp. The inside is wedged against the trunk floor edge with carpenter’s door plumb wooden wedges. In the second photo even though the damaged area was smaller than the first I decided to use the entire patch. Just glue it over the cleaned/prepped substrate and use a bunch of screws to clamp it until it dries, at which time the screws can be removed and the edges feathered with Bondo.

Correct way?

Incorrect way?

Regardless of the technique it will be interesting to see how these repairs weather time. I will admit that the floor and sill repairs seem very robust and I don’t foresee any problems structurally.

I’ve had a few more days to devote to the Spridget.  In the next set of photos I’ve finished with the dent repairs and Bondo phase. I also have coated all non painted and mostly hidden areas with 3M Body Schutz. It’s a rubberized sound deaden-er and sealer. It also serves to give everything a clean uniform look.

Right rear quarter

Body Schutz

Best hood of the 3 on hand..

The 36 grit tends to leave some “marks” so after the 80 and 180 grit sanding I use some glazing to fill any visibly deep gouges, hence the multi-color appearance in this last photo. Next step is to get the body and engine compartment primed for paint..

Of course the more the details are corrected, the more it pushes one to take it to the next level. I have no idea how the “1 day” paint shops can sleep at night knowing how much better a job they might have done. I’m also starting to appreciate why good body shops charge so much money, the price of materials notwithstanding.

Anyway, here it is in primer and awaiting today’s job of blocking. I did 3 coats of primer so I’m going to start with 180 grit to speed the process along. I finish with 400 wet or finer..


primed and ready to go?-- NOT!

Rear quarter shot

Still have a lot to do here..

So today I spent 10 hours block sanding every square and curved inch of the project car. I used 180 grit dry since I had applied 3 or more coats of primer before the guide coat and 400 or finer used wet would have been a multi-day affair.  I found some low spots and filled them and I found some high spots and I hammered them, and then I re-shot the repaired or sanded to bare metal areas with another coat of primer and then I re-shot the entire car with a light even coat. Next I’ll do the 400 grit wet and it should go very quickly as it it already flat and straight except at the repaired spots, but they are small and not very numerous. After that step it’s time to consider paint type and color… decisions, decisions… And lastly, but not leastly.. a tip of the hat to my pal Bruce, who volunteered to come over and help with the blocking. Thanks bud!! PS: I’d add more pictures, but it looks just like the ones above.. or nearly so.

Well…… I went and bought all the “stuff” for the base/clear coat.. ah $425 .. I’m quite used to and pretty good shooting good old Imron..  Let me set the stage.. it’s been about 60 degrees at 8 am the past few days but very windy by mid day.. So yesterday I got all the base color laid down and only a couple mishaps that were easily fixed. I usually use a little “repair” gun for bikes and rarely have used my big full qt. cup gun. But after adjusting the fan pattern and the air pressure it went OK. Now I’m told that I have to shoot the clear within 5 hours or I have to wet sand the car again.. OK the wind is still not too bad and all the scurrying about has me warmed up and I’ve not even thought about the ambient temp. The directions say two med-wet coats. OK Well not really, the clear is not flowing out because its too cool outside, if I try to make it wetter it just runs. what a mess, what a waste. Well, I guess a learned a lesson and that won’t happen again. Or I’ll just let the car guys do the painting! here’s a trick I learned after the fact for you DIY outsiders.. Put the paint in the microwave and warm it up first…why didn’t I think of that? I’ve put catalyzed paint in the ice box overnight to slow it down. I’m going to wait until this week of high wind speeds blows through and after a day or two I’ll wet sand it out, being very careful to not go through the color coat! And try it again when the conditions and pressure are better.. Here are my disappointing results..

double click to see how bad... arrow back

More work to do..

re-loaded

Wet sanded/blocked all the orange peel last evening. Actually it wasn’t a bad as I’d expected. It doesn’t have to be perfectly flat as the clear will fill what I’ve left behind. There are tape markers where I went thru to the primer. This morning I’ll go get an adequate amount of a less expensive urethane clear that has a slower flash time. I thought initially that it was the temperature that was the reason it didn’t flow out.. nope, it was setting up too fast.  Good for spot repairs, but not for an overall car shoot.  I’ll get a pint of color and fix those spots. Then I’m going to tarp off an area in the shop to paint it indoors. I have a couple big floor fans that will help. This isn’t the “right” way to paint a car, but it’s a one time deal… till the next one  ;~)   I’m also going to get a small can of reducer for the clear, Just in case I’m wrong about the drying time. Don’t want to sand it again!

The ’60’s circa dash panel arrived yesterday. It has had an extra instrument hole cut in it. I’ll either weld in a patch or add an ammeter or voltmeter… a work versus money decision..

I’m beginning to think this car is jinxed… Spent several hours repairing the dash and the paint went south on that too.. Monday last I had a professional painter friend come over to do the clear coat (I’m tired of messing it up) Well, he didn’t have much better luck. The back half of the car is fine, but the front half has water spots and enough hair and dust to make it in-salvageable. So I’ll sand it down again. This time I’ll just take the front fenders and hood to his shop where hopefully it’s not as dusty or dirty..

close, but no banana

this half I'll mask off and work around

This has gotten out of control as a fun project. I decided to just re-shoot the front half here, but out side again, instead of taking them to the other shop. I may have also decided to leave it as a Midget variant. The Sprite dash is going to be a PITA and requires new larger diameter instruments. Remember I was going to keep the drive train and recycle the rest at the beginning and I’ve already spent too much money just to make it presentable. So today’s result is OK, probably better than the back half now. I did get a couple small runs in the clear, but they will buff out and be just fine..IMHO. Here’s it is pre buffing..

ready to be buffed out finally.

I must say that the painting turned out to be a frustrating addition to a skill set. Most would agree that they want  the best result from their skill level. Well, where does the practitioner say enough is enough or that is not or is good enough. What about the parts and pieces that will be mounted on or adjacent to this shiny new paint? Personally I wanted the paint to look really good so when someone asks “Where’d you have it painted?” I could puff up a bit and say “Why I did it myself in the drive way” The reality is that now I have to spend extra time or extra money on the rest of the rehab to match the quality of the paint work.

Here it is with the fenders finally bolted on and the repaired grille in place and ready for the wiring and plumbing work to commence.. I thought about “making it run” for the first time today. It’s been here for 9 1/2 weeks now and if my real job doesn’t get in the way perhaps it will be on the road in another 2 months.. give-r-take

Some assembly required..

piece by piece

and hour by hour

The head light buckets were total trash in the original car. I spent nearly 6 hours repairing and piecing and polishing up my “cleanest dirty shirt” assortment of parts to get the two I finally installed..

Well, I was running out of things I wanted to do next so I decided it was time to think about getting the engine installed and running. So I moved the power-plant to the other bay and drained the oil as I wanted to drop the pan and inspect the bearings before it went back into the car. I had turned the engine over with the starter motor before it came out to check for compression and ugly noises and it made sorta OK compression (for a car that had sat for 20 years) and I didn’t hear anything bad. Well, you guessed it, after the pan was off I saw the oil pump screen was coated with chewed up bearing material. Yup, number 4 rod was spun. Damn, I hate it when that happens. I think in the interest of time I’ll use an available re-built engine and deal with this one later. It just means more money to spend now, but it will give me a better sales pitch for this right now.  When I had separated the gearbox from the engine I found the carbon facing on the release bearing gone and had assumed that the owner couldn’t put it in gear and had simply parked it for that reason…

missing carbon face on the Throw out bearing

but, here is the real reason it was parked..

#4 rod needs about .020 removed.... sigh

In the meantime, even though I have a miserable summer cold, I have the rest of the dash instruments installed and wired up. The harness I got from my trusty British car parts wholesaler is very close but not quite right for this year of Midget. It’s missing a couple grounds so I’ll get them made up shortly and that should make the dash lights work. Also the seats are back from Jim and Jerry Tanny’s upholstery shop. I can’t bolt them in until the carpet is down.. another semi big job for me.

The good news today is that the rebuilt engine arrived today. It used to belong to a Austin Healey club member in the Chicago area. He was traveling to one of the Healey gatherings on the West Coast and spun a bearing. A local Healey club guy gave him a spare he had and the Chicago guy paid to have this one rebuilt. So it’s just been sitting for a couple years waiting for a new home. I’ll eventually rebuild the one from this car when the urge and sufficient funds move me to do so. Here’s the most recent pictures..  The club guy recalls that the head had been modified. I measured it as best I could without removing it and well, it looks pretty stock to me. It is a later head, that had air injected into the exhaust ports, but no signs of porting or polishing or even much if any removed from the height dimension. I do know that the push rods all hit the rockers off center. I’m not sure if I should be  concerned or if this was purposely done to make the valves rotate more. I checked a couple others I have in the shed and they all seem to be about half this way…. ??

dash and instruments

seats from a '65-ish car

Re-built 1275cc engine"

I’m thinking about painting it gold. British Motor Corporation had a “Gold Seal Replacement” program for their replacement power plants. And they were painted a sort of gold color. I did this once before on one of my Bugeye Sprites and I liked the way it looked and it was always a good story to explain why it wasn’t the “proper” engine color…

Well, I’ve gotten ahead of the story line. An able bodied friend arrived and we dropped the engine/gearbox into the chassis before I took pictures of the gold engine block. Well, you get the idea.  I rebuilt the carbs while the paint was drying. Even after several hours in the carb washing machine still most of the black oxidation was untouched. I gave it my best shot. It won’t affect the operation any, but clean and shiny is often good for another 10MPH ;~)

Gold Seal Replacement?

..and the other side

I got the engine running yesterday. It was a bit disconcerting at first. Though I tried to get some oil pressure just spinning it with the starter I couldn’t get any reading and was worried I might have to pull the engine to see if it had the correct pump (which I’d assumed was done when the engine was rebuilt) I tilted the car, I squirted oil into the oil lines still no pressure. Finally I removed the sender line at the block and it squirted out like a geyser. Turns out the 20 year sleep for the gauge was the problem. I gave it a few sharp taps and it finally started to register. It still sticks so I’ll pull it out and get it serviced.

Though I marked the crank pulley with paint I still couldn’t see the mark to set the ignition timing. So I put it in 4th gear and pushed the car to rotate the engine…. except nothing happened. What now! I checked the gear box before I bolted it up. It was fine, but now no connection with the engine. I’d replaced the pressure plate and clutch disc since the old stuff had the chewed up release bearing. I know I installed the correct release bearing?? What I hadn’t done is any service to the slave cylinder. Well, geeze, no wonder the old release bearing was so worn, the push rod the previous “mechanic” had made was over 2 inches longer than is specified for the 1275 series…

Clutch slave components

In the above picture, the correct push rod is the short one, the bottom most one is what was in there and perpetually holding the clutch in a partially released condition.  I’ll get this re-installed and I hope to have the use of the gearbox afterwards.. I should have done this when it was out but sometimes I can’t get it through my thick skull exactly how stupid some mechanics/owners are…

new seat

This is the only current new picture from this week.. The carpet, panels, and seats are in. waiting for some weird packing pieces to install the top frame and add the new top… I’ll have more soon.. The car is running down the street and sounding good.. Oh yeah, the windshield and side glass is in as well. Now sporting a full tinted windshield…

front quarter w/ rebuilt/repainted wheels

rear quarter shot

OK, now it’s starting to look almost finished, eh? New tires all around and spare too. A few more interior trim items and the new top and I’ll head to DMV for the title hassle I’m sure to encounter..

nearly ready for prime time...

Here it is in pretty finished condition. I’m still awaiting a State VIN inspection so I can get the title work completed and then I can do some legal driving to shake out any problems that may surface..

Snug as a bug

Looking finished at last..whew!


Comments (0)