The House on Arno NE

Posted on January 19th, 2014 by Dave under Uncategorized.
Tags: , ,

A surprising number of folks have asked me about the round adobe house I call home after seeing the couple snippets over on the Picasa gallery. So, OK here’s a bit more about it.

First, Arno. Arno was the name of one of early Albuquerque developer Franz Huning’s sons.  His two other children, Edith and Walter also have streets in their names. The general location is near downtown on the edge of the so called North valley. Officially it is the Stronghurst neighborhood, reported to be the 1st such association in the city’s history. I have not researched all of this but I’m fairly confident someone will quickly point out any errors…

This property is 3/4 of an acre and the neighborhood was re-platted into really odd shapes and sizes in the 50’s and 60’s. It has a SU or special use zoning. This one being part of an old veterinary clinic belonging to the parents of the 1st owner of the hovel, err, house.

The first owner was one Stanley “Ivor” Williams. Williams was a student of Frank Lloyd Wright at the Taliesin West school of architecture. I think this was Ivor’s first house he built, along with a couple friends on a shoe string budget. It was about 1964.

Wright was a fan of plain, simple, low ceiling structures leaving the details to the contractor to figure out on their own. Stanley was in complete agreement and when my ex-wife and I purchased the house it could best be described as a dark, poorly finished cave. She loved it, I hated it. My fate was sealed.

Click on pix to enlarge. Use “Back Arrow” to return to text.

Snow day

This is the picture most have seen. The roof is shaped like a floppy Mexican sombrero, the tallest center structure is the central column from which everything cantilevers from and which houses the heater for cold days like this one..

Early Fall I think

This is roughly the same shot, inside the gate. The floor joists for the main living area are just visible poking through the left side, under the rectangular window. Ivor used wood protrusions through the walls in all his subsequent buildings. These pictured lend themselves to a simple out door table top.

The front door is pretty unique. It pivots inwards on two offset bearings. Note that the threshold is sloped!

To the right of the door is a second addition that the second owner added as a home office or guest room with a bathroom. Good thing too, as I spent the first two years remodeling the round portion!

Image of New Mexico Architecture

This is the south side. Floor joists pretty obvious here. Also note that the swimming pool has a pass through into the interior of the house. More on that later. In the background are the garages and workshop which I added and where I spend most of my days. This pool is a PITA, as the walls at either end make it very problematic to cover, but after a hot summer bike ride, the pool is the best. A true conundrum.

Looking West from the street-see Google maps ;~)

And here is from the North side looking West

..another Google maps view-nice summer day

OK, enough of the outside..

front door and Kachinas

I’m shooting down from the upper lever (that of the joists) and the steps in the left corner ramp gently to the below ground level master bedroom. The shape of the adobe bricks is pretty easy to see.

The Column

With my back to the door, this is the heart of the structure. It was 33 bare 2 x10”s  before I covered it with chicken wire and plastered it. The heater sounded like a C130 taking off when it started and just blew hot air randomly about the open spaces. The low wall to the left was added to keep people from falling onto the entrance level small sitting area, which was previously dirt with a small “pond”. I removed about 1100 wheelbarrow loads of dirt and rock from the inside, which are now large berms used in the landscaping..

Column too

Another shot of the column from the upper level looking back towards the door.

Very NM like space

This shot shows the entrance level, the upper level with the living room in the back left, the kitchen back right and the opening into the master bedroom. The roof joists are visible pretty clearly and why I like the place. It’s like a huge spoked bicycle wheel on it’s side. Nothing much is either level or plumb.

North wall

This is the dogs domain, they are old, this is ground level, no steps to navigate. The door in the background is the bathroom entrance. This was a half height wall originally. Winter bathing was quite cold and pretty exposed, so walls were added, as were the exposed vigas and the Bas relief Kokapelli .

By now I was getting pretty artistic with the plaster so I went for full  effect in the bathroom…

Sun-Moon rain storm..

Bathroom Turtles

Master bedroom entrance

Here’s the base of the column. The ramping brick floor curves up to the next level. The squarish base was added, as there was nothing but a small concrete pad supporting the column (read house!) The storage area doors on the left are about the only thing of Ivor’s that remain. He really liked railroad ties and rough cut lumber. The “circular” is repeated a lot, as in the floor, the master shower, kitchen work surfaces, even the master bed originally.

bedroom details

Floor detail, very big fireplace, adobe banco seating, dirty laundry…

Bedroom

Background is Imelda’s walk-in. The glass blocks face back to the dogs sitting area. The bedroom has an Asian feel, which surprisingly is very similar to Native American design.

Kitchen looking at the West wall

Only one of the living room …

This was a gathering at “the party house” looking from the kitchen entrance south towards the big, what else, round window in the living room.

About the pool in the house, I can’t find a good picture, so I’ll tell you I didn’t like it. No security and an air gap, so I fit a 1” thick piece of Plexiglas, had a guy add rock sides to the gunite and turned it into the new fishpond/water feature. Here’s the winter treatment to keep some of the leaves out of the pool.IMG_5096

IMG_5079

Sort of like a Christy draped work of art..

Well, that’s the basics. Now that I’ve started a story, it should be easy to add additional pictures and text as I can.

Thanks for taking the tour.

Dave

Comments (0)

Photo album Santa fe Style

Posted on July 7th, 2012 by Dave under Bikes, For Sale.
Tags: ,

http://imgur.com/a/BIg3A#1

Comments (0)

wHoly Mackeral

Posted on February 15th, 2011 by Dave under Bikes, For Sale, velodrome.
Tags: , ,

I have decided to attend the 2011 San Diego custom bike show as an exhibitor.  My last booth was probably an Interbike in the eighties.  Any way, it was suggested by a few that it would be cool to take a couple of the old  record bikes.. I still have a half dozen of them here in the shop. I dusted this one off yesterday. It’s probably one of the oddest of the bunch, but it did set a record the first day on the track. Oddly the men didn’t like the ideas, but the women did. Don’t ask me.. Carol Anne Bostick rode it to two records on two different dates. see

It is Columbus EL tubing.  Has some sheet metal fairing/gusseting, has a 24″ front wheel (which needs to be cleaned up), it has a gazillion holes through it (which should pique the ire of some on the CR list) and it has an eccentric BB. This last feature was an attempt to make some adjustment in seat tube angles for different riders. It added a lot of weight, but was located well below the axle line, so it added some noticeable stability with a lowered center of gravity. And note the skirts on the fork tips.. This was done after wind tunnel tests showed the air flow went up the blade instead of remaining in a horizontal flow..

Here ya go…

fork detail

still ready to go

with flash enhancement

last one- click on to enlarge pixs

I’ll put this in the running for making the trip.. Perhaps a vote is in order as the showtime nears.. dp

I got the 14 foot ladder out and got his bad boy down off the wall the other day. It was so filthy with dust that I’d forgotten it had a pretty cool fade paint scheme.. This one was used exclusively for track record breaking. The most notable is Kent Bostick’s  100 kilometer record. Like some of the other “record” bikes this record is 20 years unbroken, partly because the UCI has stopped doing a 100K event and second is because riding 60 miles at full bore is a really tough challenge, though the popularity of brevets would indicate otherwise.

Kent’s time is 2 hours, 9 minutes and 11 seconds  about 28 mph average! In comparison the UCI record held by Ole Ritter was 20 minutes slower.. Kent, you the man!

Here’s some pictures:

Time machine

It is Columbus MAX tubes, Cinelli cast BB, Zeus track dropouts, streteched Kevlar disc wheels (supplied by Scott & Vickie Gordon), Shimano drive train (supplied by Shimano-Wayne Stetina, Continental Olympic and Panaracer 26″ front tubulars  and a very early CF seat post. The whole package was 15 pounds.

seat "lug" aera

early aero bars

a pretty handsome "working bike"

This next one is a little different, but one that caused both great angst for me and great satisfaction.

The complete story of the bike is in an earlier blog post if one cares to go back a ways.. I’ll try to link to it before I run out of time tonight. Here:

To make a long story short, this is still after 18+ years the National Tandem TT champ.. and here are some pictures of how it’s set up now for riding with anyone who’s daring enough to trust a half blind captain…

The first green machine

It’s all Columbus MAX tubing except the oval boom and the middle seat stays which are fork blades as I recall.

close quarters for stoker

Adjustable stem reach

I got this from Pino Morroni. It’s part 3TTT and part Pino and is very handy for fitting different riders. Also a stayer brace is added to stiffen the bars, which as tandem riders know can deflect a bit with the mass at hand.

More funky Porter forks..

More choke holes and skirts.. what on Earth was I smoking?

Rear stays, track ends w/ der hanger

I worried that the Max chain stays weren’t up to the job so I added a second set of stays..

Captains seat tube area

Captain's BB and lateral joint

One of the stiffener tubes can be seen in the boom tube. One can click on the photos to enlarge them, then use the “BACK” arrow to return to text..

Stoker's BB and a tangle of tubes

and lastly for those of you curious about the handle bar stem another shot for you..

Pino's handy work..and 3TTT

I’d like to have another of those MAVIC headsets.. a real work horse..

that’s it.. Dave


Comments (2)

Used Porter Columbus Spirit frame

Posted on February 10th, 2011 by Dave under Bikes, For Sale.
Tags: , , ,

I had this same frame up for sale several months ago. Unfortunately I knocked it off the hook it was hanging on and bounced it off the fender of a customer’s car fender. Ahh, both were dented…  The frame fared better than the car, but it’s really hard to sell damaged goods. So I stripped the paint, repaired the small dent and polished the dropouts as a bonus.

It’s a 58cm seat to top, 57cm top tube c to c. Seat angle is 73 degrees and the head tube angle is 72 degrees. It weighs a tad over 3lbs and is freshly painted with DuPont Imron slate grey metallic  and clear coated too.  It’s a 27.2 seat post, English threaded BB and 130mm spacing. The Columbus Spirit (shaped) tubes are arguably the most advanced bicycle steel tubing ever offered.  Near the weight of carbon fiber, but the resilient high performance feel only steel can offer.

This was a frame I made for my personal use as a long distance road bike. I’m an old racer at heart and still like the steeper head and seat angles, so it just sat around collecting dust. This should make any discerning collector a really nice bike! It’s an inch and a quarter ID head tube for thread-less fork. I am asking $750.00 and I’ll ship it anywhere in CONUS.

right side-click to enlarge

“Back”  arrow to return to text.

Silver Jack Rabbit & turquoise

Left side

Call me at 505-352-1378  Dave……..

Comments (0)

A Tandem for 2011

Posted on December 25th, 2010 by Dave under Bikes, For Sale, Tandem bicycles.
Tags: , , ,

It’s been a year since the last tandem was finished. It was a success that, fortunately, matched my expectations, but being a track tandem it was a financial nightmare. Link to that build here. Like unicycles, the market is really small and the fixie group hasn’t decided they all need a tandem to round out their collections. So, I just spent another $800 bucks for this pile of very new steel (well, Niobium) tubes from Columbus. There are a couple odd balls, like the round Cromoly boom tube a 9/6/9 (that’s frame builder speak for the wall thickness of a butted tube, er, the ends and the middle).

There are 5 Columbus down tubes used for  the down tube, top tubes and the laterals. Normally they are 0.5/0.38/0.5mm for the Spirit road set.  These are .6/.38/.6  So just a smell more beef at the ends and this should be the cat’s meow for a tandem application.  Bear in mind that this is going to be a

Raw ingredients-stir and bake at 1200 degrees

geared road version with no intention of loaded touring.

Honestly, I’m swamped with automotive work and hopefully now that I’ve put this up for the world to see, it will push me to get started on the work I love the most and take a break from the work that pays the bills every month.   ;~)

Before I forget, again, here’s a picture, nearly an optical illusion, of one of the Columbus Spirit (shaped- not that round Over/Size “for lugs”  stuff the other guys are using)

As you can see it is oval-ized at the ends but the oval rotates from vertical at one end to horizontal at the other. One can also see the 8 sides. It is a marvel of tubing design, should such a marvel interest one…

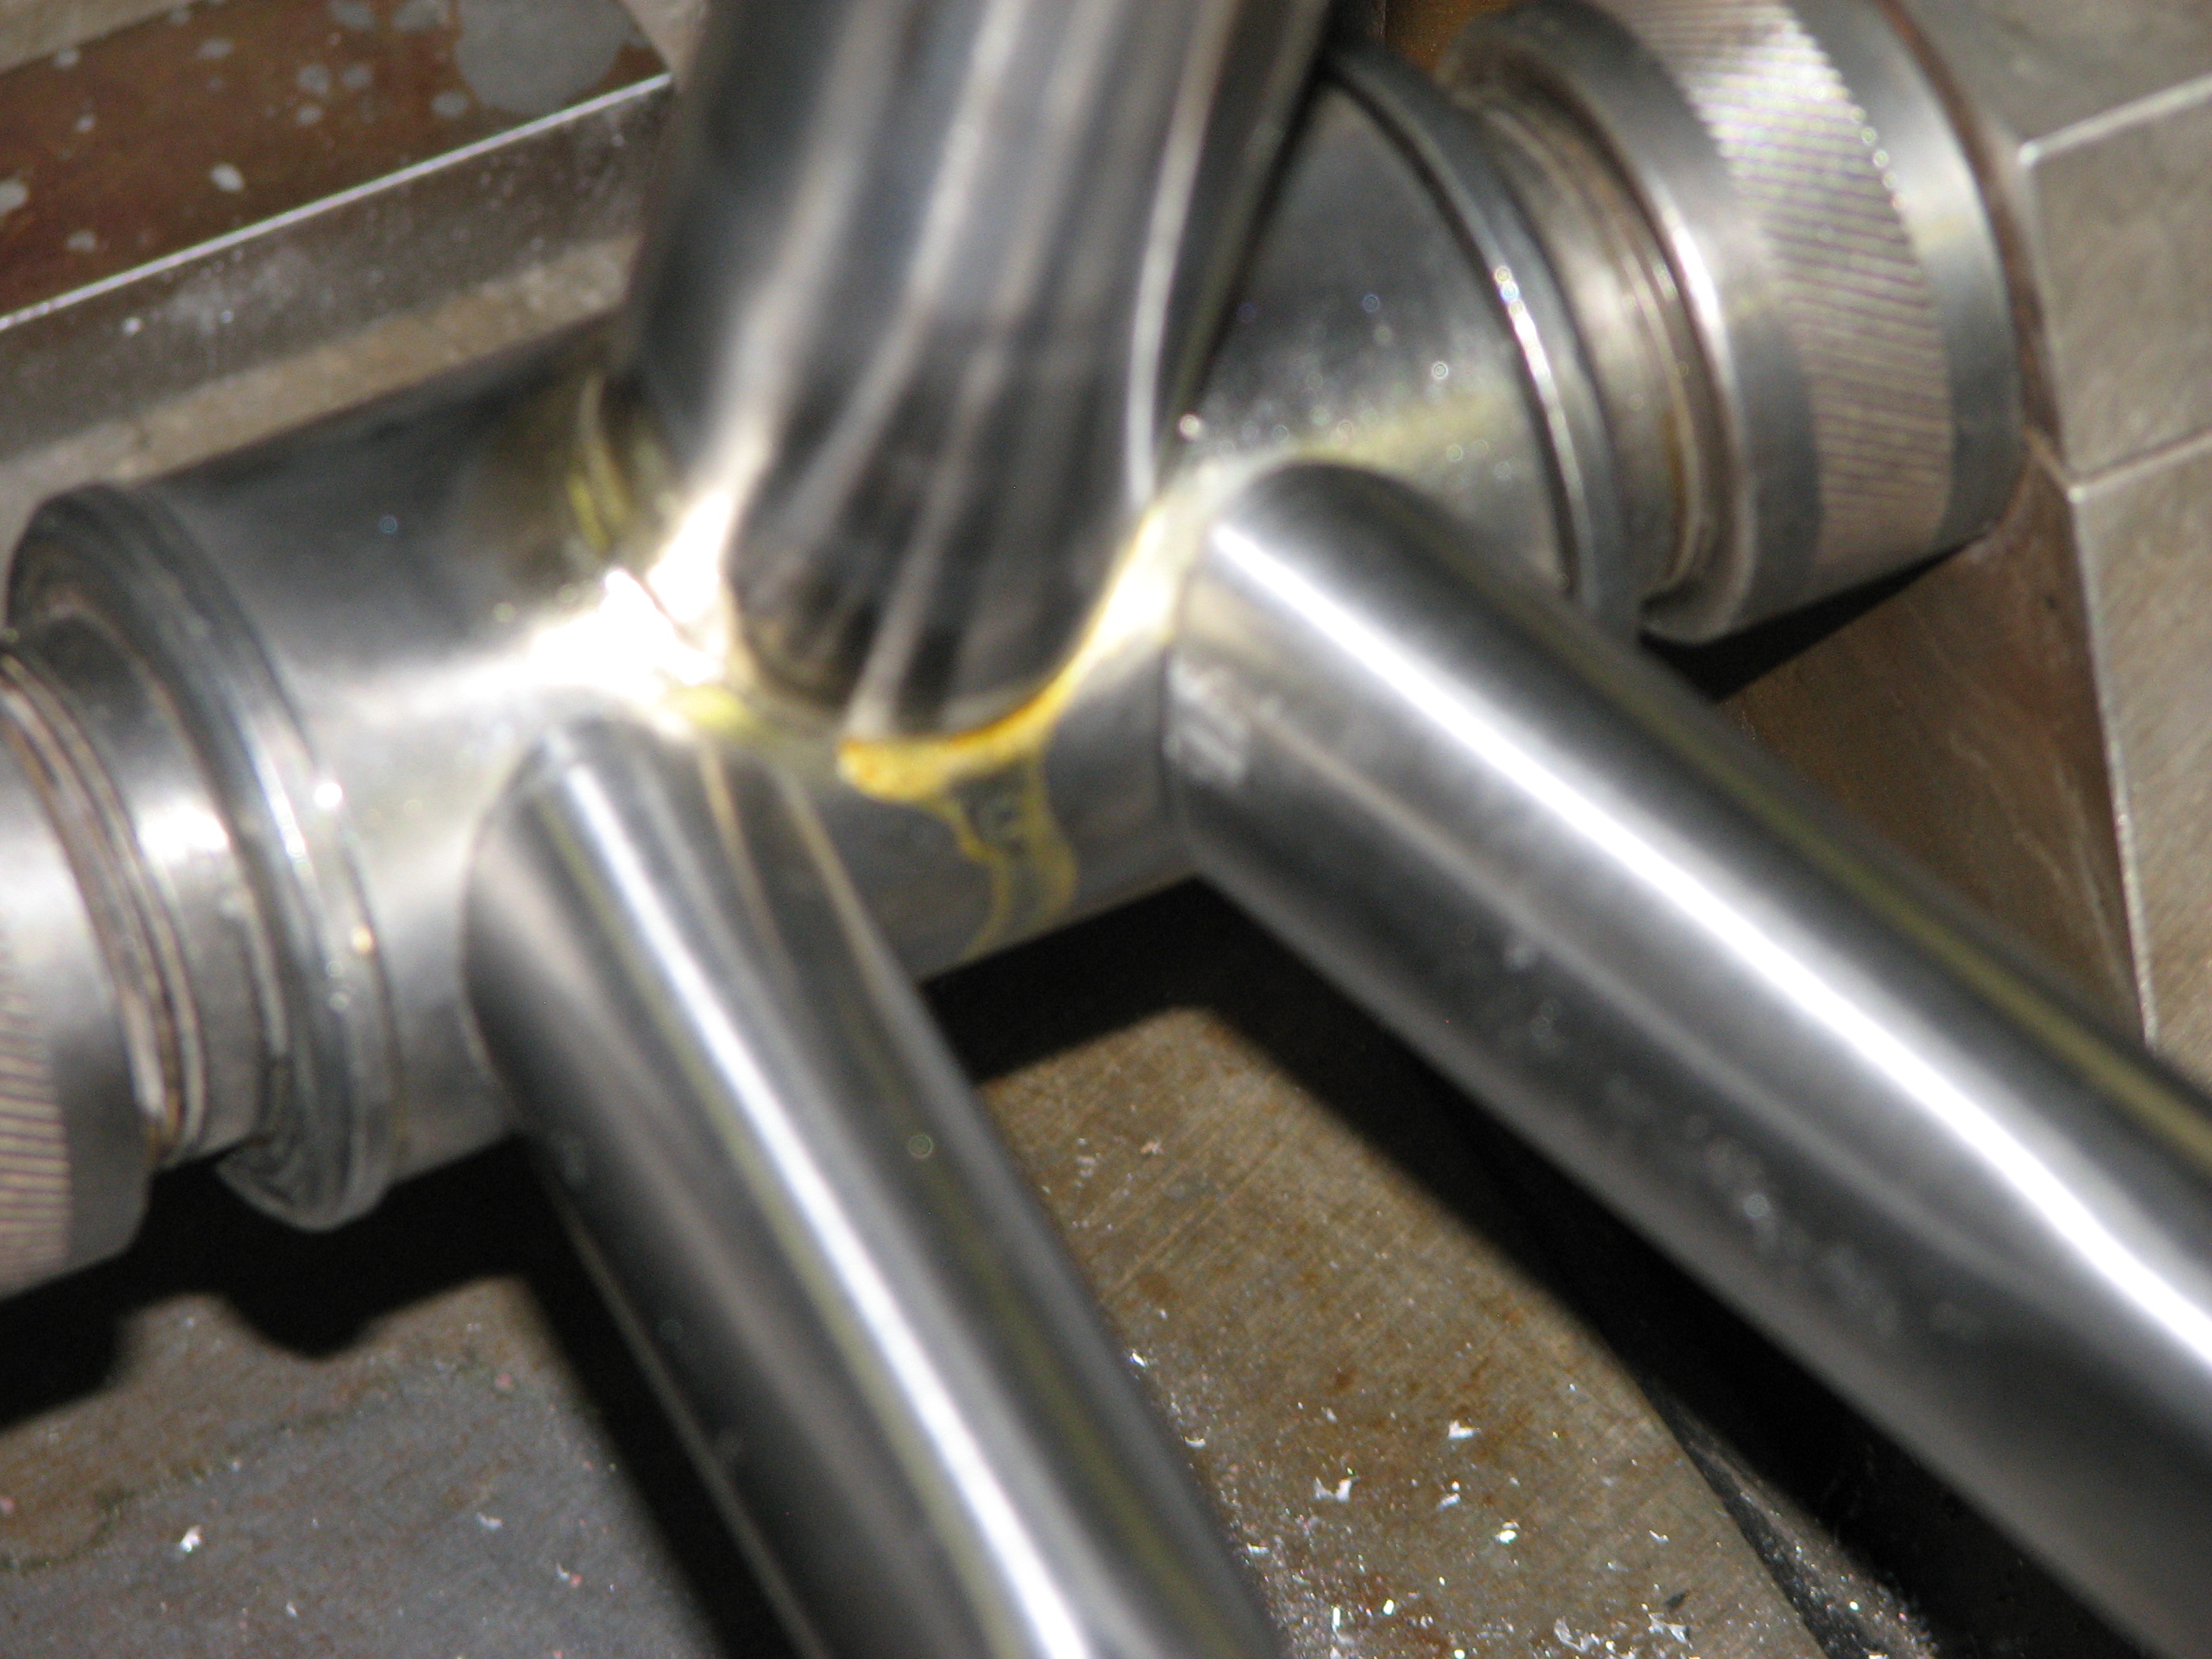
At the heart of the matter

By the way,  a comparable Carbon Fiber down tube of equal length weighs about 50 grams, these weigh 60 grams..

With all the talk on the various frame-builder forums and chat lists about how to lay down the perfect fillet, try one or two of these on for size. It ain’t in Kansas anymore..

For anyone wondering, I’ll be using Fillet Pro silver based filler for 98% of the joining.  Great product, available here  http://www.CycleDesignUSA.com hope that link works..

OK let’s get this show on the road…

I spent an entire day trying to decide what to do with some of the design elements to come. Chauncey came by and then re rehashed the whole project over again and I finally drilled and tapped a couple new holes in the jig to lengthen the boom tube another one inch. It’s up to 650mm c/c now..

preparing jig for tandem build

Remember, click on photo to enlarge and use return arrow to return to text..

So here are the front eccentric and the rear (stokers) BB shells loaded in the jig and drilled for brazing vent holes.

Choosing the boom tube

Well, I had wanted a full length oval boom, but was unable to get one in a timely fashion so I bought a round 9/6/9 mountain bike down tube at 750mm but, it was too heavy and I couldn’t make myself like it enough to use it, so during the process of wasting the afternoon I found this slightly surface rusted Columbus MAX OR down tube, also 750mm long and I was just informed by a reader that the OR down tube is also 9/6/9.  It is perhaps  half the weight and oval-ized at both ends. Bonus!

front BB and boom tube

So I blasted it, mitered it and then did the other end..

rear BB shell and boom tube

here’s the cold fit look.

cold fitting-pre brazing

It’s time to give a plug to my collaborator from the last tandem.. Thank you Mr. Martin Manning!  Part of the reason I wasted so much time was deciding on some of the attributes I’m hoping for from this more versatile bike. So Martin and …well, it was mostly all Martin,. He made some insertions and changes to the track tandem drawing with his Bike Geometry program. (What a cool tool and its free!) I know there are some other programs out there to design with, but this one is very, very bicycle specific and Martin is so into bike design.

So, this is out of sequence, but here’s the 1 1/8th” head tube at it’s 74.5 degree angle. What? Yes, it’s going to have a 1″ steel, but thread-less steerer.  I like steel and I like to decorate it with silver. Get over it..               Builders note: Turns out that the thread less plan didn’t pan out as expected. It’s a threaded one inch steerer with a Cane Creek mod 100 doing the work load and a Nitto adapter for the stem adapter.. end note.

74.5 degrees

OK, time to get some more heat (and fumes) in the shop. It hasn’t been above freezing here for the last 2 days.. So, here is what I did for the second time. I’ve loaded the ID of the boom tube with 38 percent silver paste. This after coating with flux. The paste has its own but I found that more is better to get the 38% to move a little better. The point here is to create an internal filet at the same time I’m building the external filet..

silver paste "Butter"

Moving right along now..

eccentric post filet

so, here’s the “keel” backbone,

partial "keel"

next the chain stays. And lastly today, while Chauncey was here, he did some practice welds with the TIG on some stainless, like these, except these are mine… not very clear and probably just as well and anyway I don’t think I’ll ever TIG weld a bike frame

TIG'd stainless w/o filler practice welds

So today’s project was to get some work done on the chain stays, specifically the dropouts attached, but no, I out smarted myself. I bought another set of the cast adjustables like I last used on the Mini-MAX frame a few months back.  Well, it was a nice idea, but there is no way, short of S-bends in the stays to get the 140mm spacing needed for this tandem. Oh! How about Keith’s new Tito drops… well, they will bend, but they are a little too short for that and then to still have the finished look I would have wanted. Darn. So, without too many tears I went to the trusty file cabinet and found a suitable set of forged Columbus horizontals… here’s the choices..  (several days later: This just in from one of my growing list of guardian angels, Wayne on the Hobbs Tandem list tells me that the new “conventional” rear axle spacing is 145mm and wider still for Santana tandems- so much for convention ;~)  )

Decisions-decisions

And here is the brazed up stays and drops. I’ll file these next so I don’t have to do cleanup work after the seat stays are in the way to impede access to all surfaces. After they cool, I keep an old coffee maker next to the bench and soak the flux off with hot water, then give them a run through the wire brush whirligig. It would be nice to just leave them in this semi-organic state, but the forgings are so rough I have to file them smooth  for painting. Some may wonder what the big deal is here, well my “signature” seat stay attachment can make the connection at the drop look awkward due to the more acute angle.

Ready for detailing.

It’s late, but I’ll get these up now and explain later……(yawn) morning all. OK- I managed to cut the chain stays to length (430mm) and form the miters at the BB connection (70mm drop). These are triangular shaped stays from the old Columbus EGO sets. These, sadly, were the last two in stock at Nova Cycles warehouse stash. The next sets are going to be difficult to find. I have to drill vent holes in the BB shell and I think I’ll put a couple in the distal ends too. It’s pretty dry here in NM, but generally warm enough to ride throughout the winter months and that means that condensation can be a problem when returning to a warm storage spot or the frame could end up in wetter climes. These stays are closer to Nivachrome or Chromoly so they don’t have the rust resistance that the new Niobium has.

Chain-stays mitered to BB

Dropouts in road drop fixture @ 140mm

Just a shot of the drops loaded into the road drop fixture. It has shims to achieve the desired axle spacing and removable set screws to set the side to side indexing so the drops are at the same angle. There are also some pre-set holes to add rack bosses in the usual spots.

cog-scallop

I like this picture. Simple beauty. Enlarge. (click on pix)

Moving along again after a couple  “just touch” with a file as my late friend Pino would have said. The rear axle spacing is up to 145mm and the chain stays are brazed and semi finished. No point in doing too much finish work until the seat tube, guides and whatever are attached as well.  Here’s the picture..

left side

It’s back in the jig again. Normally I’d do the front down tube next, but I’ve decided to add the set or sets of seat stays next. This means the stokers seat tube must be positioned, so I’ll get after that..

I got the stokers seat tube attached and the primary set of  seat stays ready to attach at which time my feet, which I’d already been on for 12 hours in the “other side” of the shop were telling me to call it a day. I just want to point out in the following picture the unusual shape of the Spirit seat stays. They start as the usual round taper at the dropout and then have teardrop/wing sort of 6 1/2″ long section and reverts to round again. The OD is nearly 11/16ths, which is down right big as compared to other manufacturer’s stays. It adds a goodly (technical term) amount of strength.

Shaped seat stay

Building old fashioned steel frames is a pile of work and at some points in the process there are aspects that appear to the uninformed observer as ugly..  some of this next group of pictures is were the process is between the raw weld and semi-finished. To get to the full paint ready condition takes the majority of time. Gross pipe fitting is gratifying to the builder because he/she knows that the weld is correct and that the location of the part is where it should be-sometimes not an easy task. This is more so when lug less frames have no spigots to make the job easier.

Stoker BB

Here the stokers BB is on the 4th weld, the seat post. It still has one more when the rear lateral is added. At each stage I do some shaping of the fillet and removal of the used flux and oxides of combustion that stain the surface.

Niobium and silver

Here’s a real close look.

This next shot is the “signature” seat stay connection before any shaping. This joint was done with 56% silver filler. I need the filler to easily flow into the joints with out overheating the tubes. A balancing act with the torch..

Seat tube and seat stays

The non drive side rear drop is interesting as one can see a tiny piece of scrap that I’d inserted in the weld gap to hold the drop at the precise angle. Some folks use pins or nails or other means. This is easy and effective for me..

Rear drop out

..and here’s the other side..

Columbus horizontal dropout

Now that the rear triangle is attached, I’ve attached the brake bridge. It’s not the one I wanted to use, but after searching the shop for the tried and true Cinelli 506’s for an hour I said what the hell, so I turned this one upside down (I guess- no brake bridge police that I’m aware of) and I’ll doll it up with something when I get to that point. This is also 56% filler.

Brake Bridge

A bit fuzzy

Here’s the mid-seat connection after a little work with a round Riffler file. Looks better already. Darn digital camera gets fussy about focus with out doing the Macro setting which is too close for getting the whole object and the regular  way gets too busy with background stuff..then there’s the flash prompt..geeze.

keeping things moving, I’ve attached or more aptly pre-placed the captain’s seat tube. Here I loaded the ID with silver paste and heated until it bonded with the eccentric shell. This will keep overlap welds to a minimum while the main downtube is being fitted.

Captain's seat tube

I had the chance to buy a full size alignment table from a local builder and the price was good. I don’t really think I’ve had much use for one in the past as my Morroni jig doubles as an alignment fixture, but it can’t hurt to have another nice usable tool. I added casters to it so I don’t have to dedicate too much precious space.

Bringheli Alignment Table

Here’s a new trick. These tubes are really hard to scribe a center line on since the diameter changes constantly from end to end relative to the center line. So what I do is use a carpenter’s chalk line and snap the line. It’s by eye, but that ‘s pretty good. See the blue?

Thin Blue Line

Tonight I cut the main down tube to length and mitered the ends. Spent most of the evening trying to decide the seat tube lengths and placement of the internal laterals. I don’t have a drawing so I’m using my experience and how I think it will look the best.. it’s a personal thing, functionally it’s moot.

Now here’s a couple cuts that you won’t see too often.  I do this pretty much by eye. I’ll hold the top tube more or less in place and using a Sharpie draw the perpendicular outlines of the seat tube. Then with a hole saw followed with the trusty Dynafile cut the top and bottom of the top tube where the seat tube will (hopefully) intersect. The rusty old seat tube is just a way to gauge my progress in the vice until, as below..Top tube/Seat tube intersection-captain's and from the side

gross fitting stage

and lastly tonight, here’s the front half with the main down tube brazed in place. At this point the remaining top and lateral tubes won’t be brazed in place until they all fit and look pleasing to the eye.

New and old

I didn’t get a whole lot done on the frame tonight. I managed to get the rear lateral within an inch of where I want it. The captain’s top tube is also close, but the stoker’s top tube is just sitting on top of jig held on with a toe strap!

I received an old Raleigh in the parcel delivery today. It was bent sideways at the seat stays and I wanted to get the repair done and off my plate, so that ate up some time and I dismantled some of the new alignment table. I was very unhappy with the BB post’s method of setting the shell and the cylindrical jack was several thousandths out of perpendicularity (there’s a mouthful, eh?). Drew G. at the other end of the country recommended buying brass tipped set screws for the head tube “precision bar” so it wouldn’t be scarred with every tightening. I opted for flowing a drop of silver on them, same but different. Good idea Drew. Thanks!  Nevertheless, I’ll add one more picture..

Starting to look like a bike

I forewent a bike ride on a darn nice winter day today because this frame was calling to me. Right now I’m in the stage that is tedious and slow, thus requiring  a weekend afternoon without distractions. Well, all the main tubes are cut and mitered and ready to prep and braze, except for the internal lateral joint on the captain’s seat tube. The Spirit is very thin walled and I will cut some half tube shims to beef up the joint. They are “buried” in the fillet and unseen. So more hand mitering to open the circumference there. (I don’t feel there is any need to repeat that with the seat and top tube since it is effectively reinforced with the seat post.) You can see in the next picture that they sag a little there because its not a close miter and they are sitting on a c-clamp.

Main tubes all in place

This shouldn’t cause anguish, but I didn’t like some of the decisions I’d made along the way. I really need to get this sold, I don’t need another tandem, though one fellow on the Classic Rendezvous list admitted to having eight. It is now a 58.5cm captain seat tube and a 56cm stoker. I wanted a little smaller in the rear, but I reasoned that since the stoker doesn’t have to put their foot down at every stop it would still be an acceptable compromise.

So after cleaning the tubes and lathering with flux I brazed them into place. It’s a done deal now, eh? It’s a Federal holiday today, so I have a legitimate excuse to work on the frame and not on the cars backed up in the driveway, plus it could reach 60F today and it’s time to get back into a 5 day a week riding schedule.

I’ll do some filing on the new welds and try to decide how to address the open ends of the two top tubes at the captains seat, With the MAX I used to continue the tube to the other side then add a flat cover panel. But, here I have 4 flat surfaces just begging for some shiny silver decoration.

Now I remember why its been a year since the last one. They are a boat load of work. I put 10 hours of filing and shaping the fillets in today. My right hand (dominant) was the worst burned in the fire of ’07. The web area required grafting and has always given me some grief, but I must say that spending multiple hours with a Riffler file exercising the thumb and fore finger is excellent therapy. Good thing, as there are  still several days of similar finish work still to come.

I’m very happy with my welds, only two small spots that were not fully to the height of the rest and required going back to fill.. The most difficult was the rear seat/BB/Lateral joint. If you can imagine the thick wall BB and the near paper thin Spirit tubes and then try to flow the silver on the underside of the lateral as it miters into the BB and boom tube. A typical temperature flame will rapidly overheat the lateral and burn it and too cold it will never flow out on the BB or boom. Solution was to flow the under side of the boom first then adjust the flame to a super oxygen hot with a very short flame, which won’t wash over a large surface area, but rapidly heats the thick wall tubes and flowed the silver down very nicely.

All main tubes brazed and shaped

I took a bunch of photos of the individual joints but the flash and reflections made them unusable. Maybe tomorrow with some day light I’ll try again.

The next step is to fill the gaping holes on the top tubes, which I mentioned yesterday. Unfortunately tomorrow is a work day, so maybe tomorrow evening.

Finally had a chance to work on the frame a little tonight. I need to go back and do more shaping on a few of the fillets. Tonight I decided to get after the internal laterals where they butt to the captain’s seat tube. The front lateral is shorter than the rear, consequently the diameters and shape is a little different where they butt. So, the major shape was obtained using silver, but tonight I filled some of the low and mismatched spots with lead filler. I like the lead because it goes down at about 300 degrees F.  It’s very soft and easy to shape with a file. I also don’t need to worry that flexing of the frame will crack it off, like Bondo or glaze might. Here are a couple ultra close ups. So close the file marks from the jewelers files look like canyons. The  lead is slightly darker than the steel. The yellow is the silver. These still need some emery and then primer and blocking will take care of the rest..

Right side

Left side

I felt like I left this subject hanging last night, so I took a few moments this morning to finish/sand the joint with 320 grit cloth and hit it with some flat black rattle can to see where I am in getting it looking like I want.

These tubes do more shape shifting  and have more metal contours than I usually deal with. Anyway, this is getting close and I’ll just switch to a glaze to eliminate any visible feathering.. The lead is really superior to plastic fillers but, it requires another level of supplies and expertise.

Left side-pre blocking

Right side pre blocking

I decided that the ends of the top tubes were not going to fix themselves so I cleared the bench of the heavy tools and pulled out the jeweler’s stuff. I’m running low on some of the silver sheet and I’m running low on ideas.

I decided that a nice silver Oso (bear) fetish would look OK on the cover, then I decided to do an overlay, then I changed my mind and decided to put a stone bear over the silver overlay and antique-ish the edges. Well, after nearly a half day of messing around I have this..

Captain's seat back

For the head badge I decided to keep it pretty simple. All silver.

Head tube badge

I see its been six days since I added any content to this posting, But I have been hard at work on this tandem all those days, well nights at least. I have worn my fingers thin sanding and re-sanding and then re-sanding a couple more times. I haven’t bothered with glazing putty for ages and for good reason. It will make you crazy trying to fill every file mark or imperfection. That’s why they’re “hand made” for Pete’s sake. Anyway, its as smooth as I’m going to do. The braze-on’s are on and most of the silver work is on. I didn’t post pictures of this as its pretty rote stuff. I’ll finish the last silver bit tomorrow and then get after the fork. I can see the light at the end of the tunnel. Yah!

Here’s some pictures without any explanations..

Lesft side with blocking showing

End caps and silver bridge work

Front to rear perspective

Headbadge

Bottle bosses

Last turquoise piece for the stoker

It’s been below 10 degrees F for the last two days, very unusual for Albuquerque and way too cold to work on cars, soooo I went to work on getting the fork done.  here’s the steerer and crown while still warm..

Crown and steerer joint

As I mentioned earlier in this article, I am collaborating with Martin (Bicycle geometry 101) Manning. He has  suggested a rake which results in 45mm of trail. I must say that I’m a little concerned. I’ve never built a fork with so much rake/offset as this one has. I was always happy with the handling when the trail was between 2 and 2  1/2 inches . This is about 1 7/8 inches of trail. Martin’s theory is that this will impart more low speed stability. One has essentially twice the force on the lever arm created by the trail, which makes tandems hard to handle at start-up and when climbing a steep hill.  Those situations are hard enough due to the rider coordination required.  They go fast, too, so the high-speed stuff can’t be ignored.  He believes the better compromise is to accept a little less stability at high speed in favor of the low speed operation.
Here’s the blades loaded in the jig with 47 mm of offset..

fork jig

And lastly today, here is the finished fork in the frame…

Frame and Fork

OK, time to think seriously about paint colors..

Well, after about two seconds of consideration and the fact that I have a full can of the green I painted my own bike with, here it is,  awaiting components.  Signal green Imron frame and fork…

front triangle and fork

back to front view

seat stays with turquoise

The whole enchilada

That about wraps this up. I’ll get it assembled as soon as I get all the “stuff” and then post a few pictures and an evaluation of its performance.

This project took over a month to complete and that was working on it very nearly every day. I haven’t decided on pricing yet, but no doubt it will be less than the effort expended.

Stay tuned in…

Comments (2)

My Ride- repaint 9/2010

Posted on September 15th, 2010 by Dave under Bikes.
Tags: ,

Previous appearance

I decided, due to scratches and just needing a change, that I’d repaint my personal ride.

So last Saturday after returning home from a ride I removed all the components and started to coat the frame with aircraft grade stripper. It took two heavy coats to soften the old polyurethane (Imron) and another coat for the primer. Then after a thorough washing I used a heavy grit sand paper to remove any remaining traces of paint.

I then surface prepped the Columbus Niobium Spirit  tubes with a DuPont cleaner. I had been using a DuPont acid etch primer but after what I thought were mixed results decided to go with a primer designed for color adhesion rather than adhesion to the substrate.

After the primer was dry I just touched it with 1200-1400 sandpaper and then wiped it down with a tack rag.

I decided some years ago that I really liked this green shade from DuPont, and had enough on hand to do a frame for myself.

The frame is 3 coats of color, light coat, wet coat and a wetter coat. After that stage I mixed about 5cc of the color with DuPont clear and a drizzle of blue pearlescent.  This clear coat goes on as a very wet coat.

These steps started at 1PM and the frame was hanging in the heated booth by 8PM. During the slack times I was busy cleaning the component parts and what not.

After an overnight cure (probably not long enough, but I’m really careful) I removed all the masking from the silver work that I use more and more of now. Then added new decals, still need to get a new Spirit decal from my supply house.

And after another 3 hours had the bike reassembled and ready for a ride by noon on Sun. See if you can find a turn around time like that from some other shops… ;~)

So, here’s the new look. I really like it. People now look at the bike instead of me when we pass on the streets. I even had a guy pull up along side and tell how beautiful it was, now that was a first! Also the last few rides I’ve increased my average speed 1-1 1/2MPH  just because of the brighter color.

Here’s the pictures…

Signal Green Imron

click on to enlarge-arrow back to return to text

double click for super-size

Turquoise and silver

"Mudhead" Kachina

For those of you who are unfamiliar with Native American Kachina lore here is a link http://kachina.us/

I had to laugh, I thought I should explain Kachina’s and while looking for the link above, I found the very same picture above in a site with Mudhead images.. computer age!!!

brake bridge silver details

too much coffee-sorry

Now that this has been up for a week, I thought I’d mention how many of you think that it looks way better than the previous color. I agree and thank you all.

Note to self: do not change saddle after repaint and ride an aggressive 200 mile week with a new style. DP you are old and the prostate is not what it used to be…you knew this.. The choice looked really good in theory, but did not perform as advertised for me, but (see below)

Note to others with minor to severe to preventative prostate health measures: I highly recommend the newish Sella Royal “Respiro” saddle. It has a center groove that is actually wide enough to protect the perineum and narrow enough nose to not cause rubbing and is ventilated to reduce chamois degradation. The draw back is it is rather heavy compared to other saddles but, a small concession for comfort and protection. The gel padding is quite tall and the trough created is deep so changes in angle (more nose up) and lowered seat post are required.  The last positive is they sell for about a third of the competitors, so if the gel only makes it a half season, you’ll still be ahead.

Comments (0)

Mini MAX a pictorial review

Posted on August 6th, 2010 by Dave under Bikes, For Sale.
Tags: ,

Vortex generators?

Vortex generators?

img_1769

Columbus Mini MAX  63cm with turquoise and silver detail. Silver fillet brazed.

img_1760

Seat stay connection detail.

img_1763

Bird on a wire…

Comments (0)

Silver Paste part III

Posted on February 8th, 2010 by Dave under Bikes, For Sale, Uncategorized.
Tags: ,

Just in case you readers have been asleep at the wheel, I’ve been adding some sort of Native American style silver and turquoise adornments to my frames.

The economy is still very sluggish and not a lot of folks beating down my door for car or bicycle work so, I have been slowly teaching myself to make some selected bits of jewelry like items. Here are a few belt buckles I recently finished. All are of overlay design and both use the paste silver to both join the layers and to add a pleasing texture to the exposed surfaces

Bear Claw and turquoise

Bear Claw and turquoise

Oso- Bear fetish

Oso-Bear fetish

Turtles emerging from the underworld Stabilized Kingman turquoise and white Buffalo stone on Sterling silver.

Turtles emerging from the underworld Stabilized Kingman turquoise and white Buffalo stone on Sterling silver.

The turtle motif is the latest. These are selling off the shelf as fast as I can make them. Who knew..??

Silver wolf-howling at a silver moon

..and here’s a variation on the howling wolf..

Winter lament

More to come, I reckon.

Comments (0)

Silver Paste part II

Posted on January 20th, 2010 by Dave under Bikes.
Tags: , ,

Here’s another application for the paste silver.

This is a new frame using the spigot style drop outs from Nova Cycle Supply (www.novacycles.com).  I  dabbed  about a 3/4″ line of material inside the dropout then spread it  around evenly, stuck the chain stay in, added some extra flux on the outside in case I didn’t start with enough paste and had to add regular rod style filler.

Click & double click photos for close up…

Paste flux and filler post heating

Paste flux and filler post heating

One can see that a small amount of the paste has migrated to the outer surface of the drop. There were only 2 spots a couple square millimeters that had to be filed. All subsequent clean up was done with polishing compound.

polished drops

polished drops

Worth noting here. As you can see, plain steel (not SS) can look as good as SS for less money and will retain it’s luster for a surprisingly long time between buffing up (like a year in the SW climate).

The next two photos are the chain stays to BB welds. This time I put paste inside the tubes (stays and seat) to form a small internal fillet and used rod on the external fillets. I’ll put up a picture of the entire finished joint after the down tube is mated.

Welds #1, 4 and 5

Welds #1, 4 and 5

I  mitered the down tube and brazed it in today. Again I lined the inside of the tube with paste and used rod filler for the external fillet.

Mitered down tube

Mitered down tube

Post brazing

Post brazing

Post shaping clean up

Post shaping clean up

Now, the neat thing about the butter is that I can even further reduce the size the external fillet because there is now an internal fillet to support the joint.  Here is a shot of the head tube joints. The fillet radius is tiny now. If these were regular round tubes it would show better than with the Spirit 8 sided tubes, but you get the idea.

Internal and external silver fillets

Internal and external silver fillets

Remember to double click to get super close up. Use return arrow to return to text.

…and we’ll jump way ahead and here’s the frame in it’s ready to be built up state.

Click & double click photos for close up…

Zia frame

Zia frame

Comments (0)

Silver Paste

Posted on December 14th, 2009 by Dave under Bikes.
Tags: ,

Fortunately I have been very busy since August with  car restoration work. I received some of Fred Parr’s much touted paste based silver about that time and I was anxious to try it for myself after seeing the pictures that Dave Bohm posted about his first run with the product.

Nearly all the frames in the past 6-7 years have been fillet brazed, the jig I use allows me to add one tube at a time if I choose to do it that way versus mitering everything and doing it all at once, the brazing that is.  For this trial I thought that I would use the paste to solidly tack the seat tube to the BB.

raw BB shell and seat tube

raw BB shell and seat tube

In the picture above, I have smeared a small bead of paste all around the inside of the seat tube and on the edges of the miter.

Paste silver tack

Paste silver tack

The above photo is the post heating result. I used no additional flux beyond the paste.  All surfaces were pre-cleaned with Parr’s Metal Prep product.

My thinking at this point was to also attach the chain stays in a similar fashion then remove that assembly from the jig and finish the fillets on a bike stand so I could get a clean shot at the underside.

So after asking Mr. Parr if it was ok to swab the entire area with flux, to make clean up easier, he said it was fine and could add rod at the same time too. I wanted to avoid additional filler at this stage and since the seat tube went well I didn’t anticipate any problems.

Internally pasted, externally fluxed; pre heat

Internally pasted, externally fluxed; pre heat


img_1529

At this stage, after heating everything looked good, though I could have probably used a bit more paste, but I was going from Dave B’s tutorial where he thought he may have used too much and I was, after all only meaning to tack the stays and seat tube for a later final fillet.

Final joining complete

Final joining complete

Well, the verdict is, well mixed.  When I took the assembly out of the jig, I managed to knock one of the stays off the BB. The other was fine. I’m going to chalk it up to gross inexperience with the product, though I’ve seen enough silver flow over the years to think that my heat was sufficient to accomplish the task at hand. The fact is that the interior wetting was great and I was impressed by the natural fillet that formed and can only blame myself for the lack of adequate heat to the much thicker wall shell to obtain a good bond.

I intend to try it again some where else during this build up and I really want to use it for some silver-smithing projects. Especially were extremely thin gauge silver is being joined as this stuff doesn’t require much heat to flow as compared to getting a 1/16th rod to go liquid.

I have since talked with Freddy and he advises that if one wants to use the paste as a pre-placement vehicle, then it is best to NOT completely flow the joint as the eutectic ratio properties will be exhausted and further capillary travel is unlikely.  So, hope this was as good for you. I learned something new today.

Drop a line if you have any questions.  Double click on the photos for a close up view.

Dave

Comments (0)